Blog

  • beta-reducer-in-sed

    beta-reducer-in-sed

    Description

    An implementation of [one step of] the beta-reduction from the lambda calculus. This sed-script
    can be considered to be an implementation of a simple but computationally universal (i.e.
    Turing-complete) functional programming language.

    Syntax

    The input language imitates the standard lambda-calculus notation but replaces the Greek lambda
    with easy-to-type symbol \ (backslash) and omits a dots in lambda definitions. E.g. the
    identity function in such a modified notation can be defined as \x x.

    A custom definitions (e.g., true = \x\y x) and comments (any text after -- and upto the end
    of the same line is ignored) are supported only via the additional sed-script
    preprocessor.sed.

    There is also a support for the de Bruijn indices, which can be [optionally] placed in angle
    brackets after an identifiers (see below for a little bit more details).

    Features and limitations

    Although it performs only single beta-reduction, in theory you can call this script repeatedly
    until it approaches a fixed point (or even modify the script so that it will loop until the
    stabilization). See, for example, the shell-script eval.sh and try something like
    echo "(\w\x x w) y" | ./eval.sh -.

    N.B., this work focuses on the pure untyped lambda calculus with the “call by name” reduction
    strategy (in fact, the script uses a more straightforward strategy — namely “call by
    macro expansion” in which we perform direct textual substitution).

    The call by name reduction chooses the leftmost, outermost redex, but never reduces inside
    abstractions.

    E.g., id(id(\z id z)) -> id (\z id z) -> \z id z, where id = \x x.

    In “call by name” the expressions are always passed as parameters without any attempt to
    reduce them; the reduction takes place later, if neccessary.

    In “lazy evaluation” (a variant of “call by need” strategy), we need to track repetitions of a
    parameter (enveloping it in a so called “thunk”); when we reduce one we track all others. This
    allows each parameter to be computed only once at maximum (or even never at all). The lazy
    evaluation arrives at its conclusion with the fewest reductions. So, it would be nice to
    implement the lazy evaluation but currently this script uses the “call by name” stratedy as more
    simple one to implement (for how to store a thunks across the script invocations?).

    Additionally, the script supports a de Bruijn indices (one-based unary numbers in an optional
    angle brackets after an identifier). In de Bruijn notation, a variable occurence is represented
    by the number of lambdas between this occurrence and the lambda binding the variable. E.g.,
    \x.x (\y.y x) is written in de Bruijn’s notation as \0 (\0 1). Note, that this script uses
    one-based indices, i.e., the last example must can be translated into the input language of
    this interpreter as \ <1> (\ <1> <11>)). In this sed-script the de Bruijn notation is vital
    because of its capture-avoiding properties.

    There is no any IO — a source program itself is the input and its transformed version is the
    output.

    Usage

    The script read a source program from the standard input. So, you can use the script this way:

    echo '(\x x) y' | ./beta-reducer.sed

    If you place a comma symbol right at the end of input then the script will act as an
    “echo”-command, printing its input expression “prettified”, that is annotated with de Bruijn
    indices and with unneeded parenthesis removed. E.g.:

    echo '(\x x) y,' | ./beta-reducer.sed`

    To process a macro-definitions and remove comments it’s possible to filter an extended
    lambda-script with such a features through the sed-script preprocessor.sed like this:

    cat some-extended-script.lambda | ./preprocessor.sed | ./beta-reducer.sed

    Bugs and design issues

    Beware that it’s a quite inefficient to run a lambda-programs this way — at each step it
    performs a complete reparsing of a given expression instead of manipulating an abstract syntax
    tree created only once.

    Additional information and references

    Learn more at http://en.wikipedia.org/wiki/lambda_calculus

    In near future I will write an extended explanation of this script in my blog, stay tuned. 🙂


    (C) Written by Circiter (mailto:xcirciter@gmail.com).

    Repository: https://github.com/Circiter/beta-reducer-in-sed

    License: MIT.

    Visit original content creator repository
    https://github.com/Circiter/beta-reducer-in-sed

  • dresdenstory

    DresdenStory

    About

    DresdenStory launcher icon

    DresdenStory is an app to get to know or rediscover the most exciting places in Dresden in a different and more interactive way compared to regular city guides. To reach this aim we utilized storytelling (the different points are chapters in a connected narrative), images and challenges (questions that need to be answered after each chapter) to let users enjoy the experience of getting to know or rediscovering Dresden.

    This project was created by Ana Pinilla and Valerian Lange as part of the Cartography M.Sc. programme.

    The app was written in Java only (no Kotlin), as this was a course requirement and helps to make the code approachable for beginners. The app was written for Android 12 (API level 31).

    How to work with this project

    1. Build the app in Android Studio and run it on a virtual device

    1. Clone the repository or download the zipped project and unzip it.
    2. Then open the folder in Android Studio.
    3. For the app to work properly you will need to add your own Google Maps API key. Find instructions and then paste your key here.
    4. To run the app you will then need to set up a virtual device or connect a phone using Android API level 31.

    2. Look at the code

    In app/src/main, you can find the main parts of the code of the app. If you are unfamiliar with Android projects, try reading an introduction to the Android project folder structure first.

    Functions

    The user interface of the app is structured into three main activities:

    Map activity

    See the location where each chapter takes place. Get directions to reach each point.

    annotated map activity

    Story activity

    Find historical references told through storytelling, images and challenges.

    annotated story activity screenshot

    annotated story activity interaction screenshot

    Info activity

    Find additional information about the app.

    annotated info activity screenshot

    Visit original content creator repository https://github.com/justvalerian/dresdenstory
  • PiedPiper-MicrosoftEngage

    Getting Started with Create React App

    This project was bootstrapped with Create React App.

    Available Scripts

    In the project directory, you can run:

    yarn start

    Runs the app in the development mode.
    Open http://localhost:3000 to view it in the browser.

    The page will reload if you make edits.
    You will also see any lint errors in the console.

    yarn test

    Launches the test runner in the interactive watch mode.
    See the section about running tests for more information.

    yarn build

    Builds the app for production to the build folder.
    It correctly bundles React in production mode and optimizes the build for the best performance.

    The build is minified and the filenames include the hashes.
    Your app is ready to be deployed!

    See the section about deployment for more information.

    yarn eject

    Note: this is a one-way operation. Once you eject, you can’t go back!

    If you aren’t satisfied with the build tool and configuration choices, you can eject at any time. This command will remove the single build dependency from your project.

    Instead, it will copy all the configuration files and the transitive dependencies (webpack, Babel, ESLint, etc) right into your project so you have full control over them. All of the commands except eject will still work, but they will point to the copied scripts so you can tweak them. At this point you’re on your own.

    You don’t have to ever use eject. The curated feature set is suitable for small and middle deployments, and you shouldn’t feel obligated to use this feature. However we understand that this tool wouldn’t be useful if you couldn’t customize it when you are ready for it.

    Learn More

    You can learn more in the Create React App documentation.

    To learn React, check out the React documentation.

    Code Splitting

    This section has moved here: https://facebook.github.io/create-react-app/docs/code-splitting

    Analyzing the Bundle Size

    This section has moved here: https://facebook.github.io/create-react-app/docs/analyzing-the-bundle-size

    Making a Progressive Web App

    This section has moved here: https://facebook.github.io/create-react-app/docs/making-a-progressive-web-app

    Advanced Configuration

    This section has moved here: https://facebook.github.io/create-react-app/docs/advanced-configuration

    Deployment

    This section has moved here: https://facebook.github.io/create-react-app/docs/deployment

    yarn build fails to minify

    This section has moved here: https://facebook.github.io/create-react-app/docs/troubleshooting#npm-run-build-fails-to-minify

    Visit original content creator repository
    https://github.com/Rohitkumarvarma-369/PiedPiper-MicrosoftEngage

  • KDredX2

    KDredX2

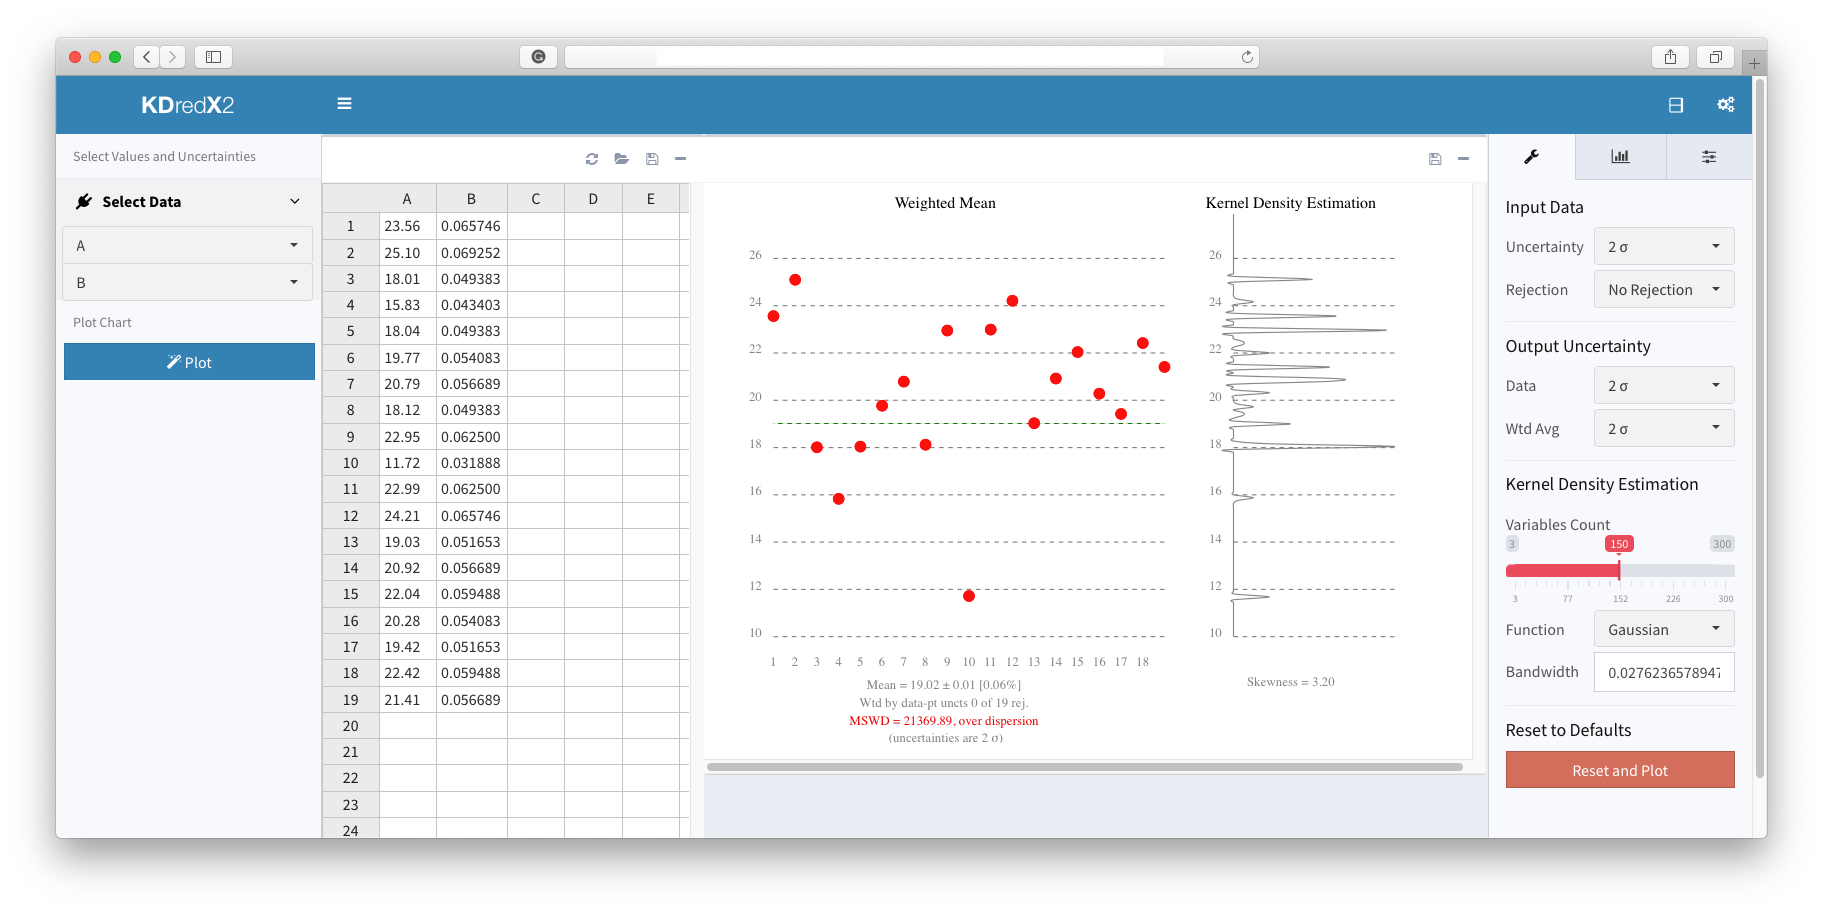
    KDredX2 [1] is a cross-platform application (kay-dee-kai; a combined initialism of kernel density estimation and reduced chi-squared) to facilitate the visualization of weighted means along with its accompanied reduced chi-squared statistic, and univariate data density. It supports exporting the visualisations in a variety of file formats and provides an extensive customization to produce publication-quality figures. The developed numerical computations provide important insight into the nature and usability of said data. Prior numerical tools developed for this purpose are only available on a single operating system and generally restricted to antiquated programming languages. KDredX2 is designed to perform the aforementioned functions in the robust Java platform.

    KDredX2 can run as a web-based or a standalone application. We have tested the application under MacOS and Windows.

    MacOS App

    KDredX2 macOS app is available here. Make sure that you have installed JRE before running the App.

    KdredX2 in MacOS

    Code Structure

    KDredX2 is a Griffon application with JavaFX as UI toolkit and Java as main language. The project has the following file structure

    .
    ├── build.gradle
    ├── griffon-app
    │   ├── conf
    │   ├── controllers
    │   ├── i18n
    │   ├── lifecycle
    │   ├── models
    │   ├── resources
    │   ├── services
    │   └── views
    ├── pom.xml
    └── src
        ├── integration-test
        │   └── java
        ├── main
        │   ├── java
        │   └── resources
        └── test
            ├── java
            └── resources
    

    Compile and Build

    You will be able to build your project with

    gradle build
    gradle test
    gradle run
    

    Don’t forget to add any extra JAR dependencies to build.gradle!

    If you prefer building with Maven then execute the following commands

    mvn compile
    mvn test
    mvn -Prun
    

    Don’t forget to add any extra JAR dependencies to pom.xml!

    Reference

    [1] Spencer, C. J., Yakymchuk, C., & Ghaznavi, M. (2017). Visualising data distributions with kernel density estimation and reduced chi-squared statistic. Geoscience Frontiers, 8(6), 1247-1252.

    Visit original content creator repository https://github.com/miladghaznavi/KDredX2
  • MovieTrailer

    Movie Trailer – Android App !

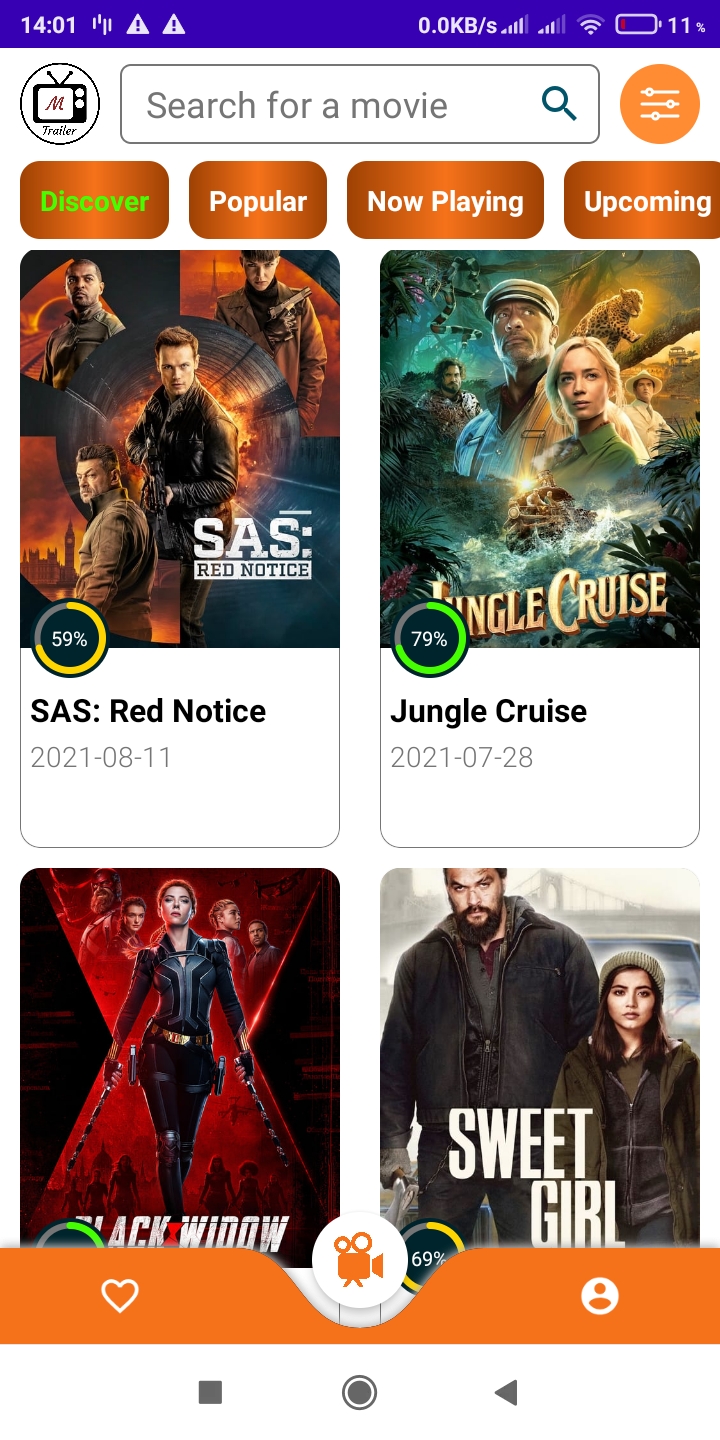
    Movie Trailer is for users who find movies very easily. Every user need MovieTrailer account and can add movies to wish list, watch movie trailers and so on features which can use

    Movie Trailer is available on the Google Play Store.

    Get it on Google Play

    Main Features

    1. Kotlin
    2. Java
    3. Firebase
    4. MVVM
    5. Navigation Components
    6. RxJava/RxAndroid
    7. LiveData
    8. ViewModel
    9. Retrofit2
    10. RoomDatabase
    11. Coroutines
    12. Memory leak
    13. Glide
    14. Gradle
    15. Custom Fonts

    Screenshots

    Libraries

    1. Firebase Authentication
      implementation 'com.google.firebase:firebase-auth:19.2.0'
      implementation 'com.google.android.gms:play-services-auth:19.2.0'
      
    2. Firebase Database
      implementation 'com.google.firebase:firebase-database:20.0.1'
      
    3. Firebase Firestore
      implementation 'com.google.firebase:firebase-firestore:23.0.3'
      
    4. Coroutines
      implementation "org.jetbrains.kotlinx:kotlinx-coroutines-android:1.3.9"
      
    5. Navigation Components
       def nav_version = 2.3.5
       
       implementation "androidx.navigation:navigation-fragment-ktx:$nav_version"
       implementation "androidx.navigation:navigation-ui-ktx:$nav_version"
      
    6. ViewModel
      implementation "androidx.lifecycle:lifecycle-viewmodel-ktx:2.4.0-alpha03"
      
    7. Live data and Annotation processor
      def arch_version = "2.1.0"
      
      implementation "androidx.lifecycle:lifecycle-livedata-ktx:$arch_version"
      annotationProcessor "androidx.lifecycle:lifecycle-compiler:$arch_version"
      
    8. RxJava and RxAndroid
      implementation "io.reactivex.rxjava3:rxjava:3.0.13"
      implementation 'io.reactivex.rxjava3:rxandroid:3.0.0'
      
    9. Room components
      implementation "android.arch.persistence.room:runtime:1.0.0"
      implementation "androidx.room:room-runtime:2.3.0"
      kapt "androidx.room:room-compiler:2.3.0"
      
    10. Retrofit2
      implementation 'com.google.code.gson:gson:2.8.7'
      implementation 'com.squareup.retrofit2:retrofit:2.7.2'
      implementation 'com.squareup.retrofit2:converter-gson:2.5.0'
      
    11. CircleImageView
      implementation "de.hdodenhof:circleimageview:3.1.0"
      
    12. Bottom navigation
      implementation 'com.etebarian:meow-bottom-navigation:1.2.0'
      
    13. Glide
      def glide_version = "4.12.0"
      
      implementation "com.github.bumptech.glide:glide:$glide_version"
      annotationProcessor "com.github.bumptech.glide:compiler:$glide_version"
      
    14. Progress Indicator
      implementation 'com.mikhaellopez:circularprogressbar:3.1.0'
      
    15. Youtube Player
      implementation 'com.pierfrancescosoffritti.androidyoutubeplayer:chromecast-sender:0.23'
      
    16. Loading button
      implementation 'br.com.simplepass:loading-button-android:2.2.0'
      
    17. Circular ProgressBar
      implementation 'com.github.ybq:Android-SpinKit:1.4.0'
      
    18. RatingBar
      implementation 'com.github.shallcheek:RatingBar:v1.0'
      
    19. Balloon
      implementation "com.github.skydoves:balloon:1.3.6"
      
    20. Day Night Switch
      implementation 'com.github.vimalcvs:Day-Night-Switch:1.0.3'
      
    21. Custom Toast
      implementation 'com.github.GrenderG:Toasty:1.5.2'
      
    22. Memory Leak
      debugImplementation 'com.squareup.leakcanary:leakcanary-android:2.7'
      
    Visit original content creator repository https://github.com/r4m-rufat/MovieTrailer
  • DearCyGui

    Visit original content creator repository
    https://github.com/axeldavy/DearCyGui

  • repositorg

    Repositorg

    Build Status

    Repositorg is Python module that lets you automatically reposit, organize, rename, and process large collections of files (e.g. pictures, or video).

    Installation

    Repositorg is available for Portage via the chymeric overlay as app-misc/repositorg. Just run the following command:

    emerge app-misc/repositorg
    

    If you are not yet using this overlay, it can be enabled with just two commands, as seen in the README.

    On all other Operating Systems:

    For all other Linux distributions or operating systems, the script can also be run directly from its containing directory (and thus, needs only be downloaded from here):

    git clone https://github.com/TheChymera/repositorg.git /your/local/repositorg/path
    pip install [--user] -e /your/local/repositorg/path
    

    Usage

    Functions from the repositorg module can be called from within the module directoy via Python, e.g. python -c 'import base; base.reposit()'. Additionally we provide a base command-line function, repositorg via which you can call our most frequently used functions.

    repositorg

    usage: repositorg [-h] {reposit,reformat,redundant,vidproc} ...
    

    Triggers

    Repositorg is even better in conjunction with automatic triggers. Mount or time monitoring functionality is handled out-of-the-box by your Unix-like system, but is best not hacked programmatically (especially since there is no way for us to know at what time and what devices you would like to reposit from). Therefore, as soon as you have put together a workflow to suit your needs (see examples), this will need a bit of manual configuration on your part.

    Trigger by UUID Mount

    A very useful way to trigger your workflow is automatically upon device insertion. For this you need a unique identifier for your device, of which the best is the Universally Unique Identifier (UUID). To obtain this string, run the following command, and look for the mount point on the output; the UUID will be listed to the right of it, e.g. (here it would be 2016-07-04-02-56-54-00 for the NIKON storage):

    youruser@yhourhost ~ $ findmnt -o TARGET,UUID
    TARGET                            UUID
    /                                 60eacce4-5634-4230-a87c-ff9e8d4a92cc
    ├─/dev
    │ ├─/dev/shm
    │ ├─/dev/pts
    │ ├─/dev/mqueue
    │ └─/dev/hugepages
    ├─/sys
    │ ├─/sys/fs/cgroup
    │ │ ├─/sys/fs/cgroup/unified
    │ │ ├─/sys/fs/cgroup/systemd
    │ │ ├─/sys/fs/cgroup/cpuset
    │ │ ├─/sys/fs/cgroup/freezer
    │ │ └─/sys/fs/cgroup/cpu,cpuacct
    │ ├─/sys/firmware/efi/efivars
    │ ├─/sys/fs/fuse/connections
    │ └─/sys/kernel/debug
    ├─/proc
    │ └─/proc/sys/fs/binfmt_misc
    ├─/run
    │ ├─/run/media/chymera/NIKON D750 2016-07-04-02-56-54-00
    │ ├─/run/user/115
    │ └─/run/user/1000
    ├─/tmp
    └─/boot                           3E21-D52A


    After having determined the UUID, setting your workflow up to automatically execute is as simple as creating a new executable file under ~/.repositorg/sources/<UUID>.sh (as seen here). To test the workflow, you can start the UUID trigger script (run .repositorg/uuid_trigger.sh), and (re)insert your medium. If you wish your system to always be on the lookout for device insertion, add the following line to your user crontab (start editing the crontab by running crontab -e):

    @reboot . /etc/profile ; ~/.repositorg/UUID_trigger.sh
    

    Examples

    One-Liners

    repositorg reformat -l 0 -n 79 -p nd750_ a/*MOV
    
    repositorg vidproc -p "-crf 16 -c:a copy" nd750_a00{00,01,02,03,37,38,39,70,71}.MOV
    
    repositorg vidproc -p "-crf 16 -c:a copy -filter:v 'crop=1080:1080:420:0'" nd750_a00{80..84}.MOV
    
    repositorg vidproc -p "-crf 16 -c:a copy -filter:v 'crop=1280:1080:320:0'" nd750_a00{85,86}.MOV
    

    Workflows

    Workflows are best stored in files under a dedicated Repositorg directory in the user’s home path at ~/.repositorg, for which we distribute an example. An UUID trigger is also provided, which can be called at boot, to monitor for mount events. UUIDs-based workflows (example) are best stored one directory level deeper. We further provide examples for SAMBA fetching, and client-side SSH pushing (with the associated server-side post-hook).

    Reposit audio recordings using a continuous namespace with one hierarchical level:

    This assumes that you are starting with .wav files produced by your recorder.

    cd /run/media/chymera/DEVICE0/recordings_directory/
    repositorg audioproc *
    repositorg tag -e mp3 -a "Horea Christian" *
    repositorg reposit --letters 1 --in-regex '^.*\.(?P<extension>(mp3))$' --out-string '{LETTERS}/s41_{LETTERS}{DIGITS}.{extension!l}' /run/media/chymera/PHONE0/recordings/external\ recordings/ ~/pu_data/audio/s41/
    rm *mp3
    

    Known issues

    Command Prompt Broken after repositorg audioproc or repositorg vidproc

    Both repositorg audioproc or repositorg vidproc call ffmpeg internally. When this program is parallelized, the command prompt may end up broken after the pool has finished executing. This is likely because some strange character is returned to the terminal. The solution is to type reset into the terminal (you may not actually see the test), press Enter and wait or repeat once.


    Project led by Horea Christian (address correspondence to: horea.christ@yandex.com)

    Visit original content creator repository https://github.com/TheChymera/repositorg