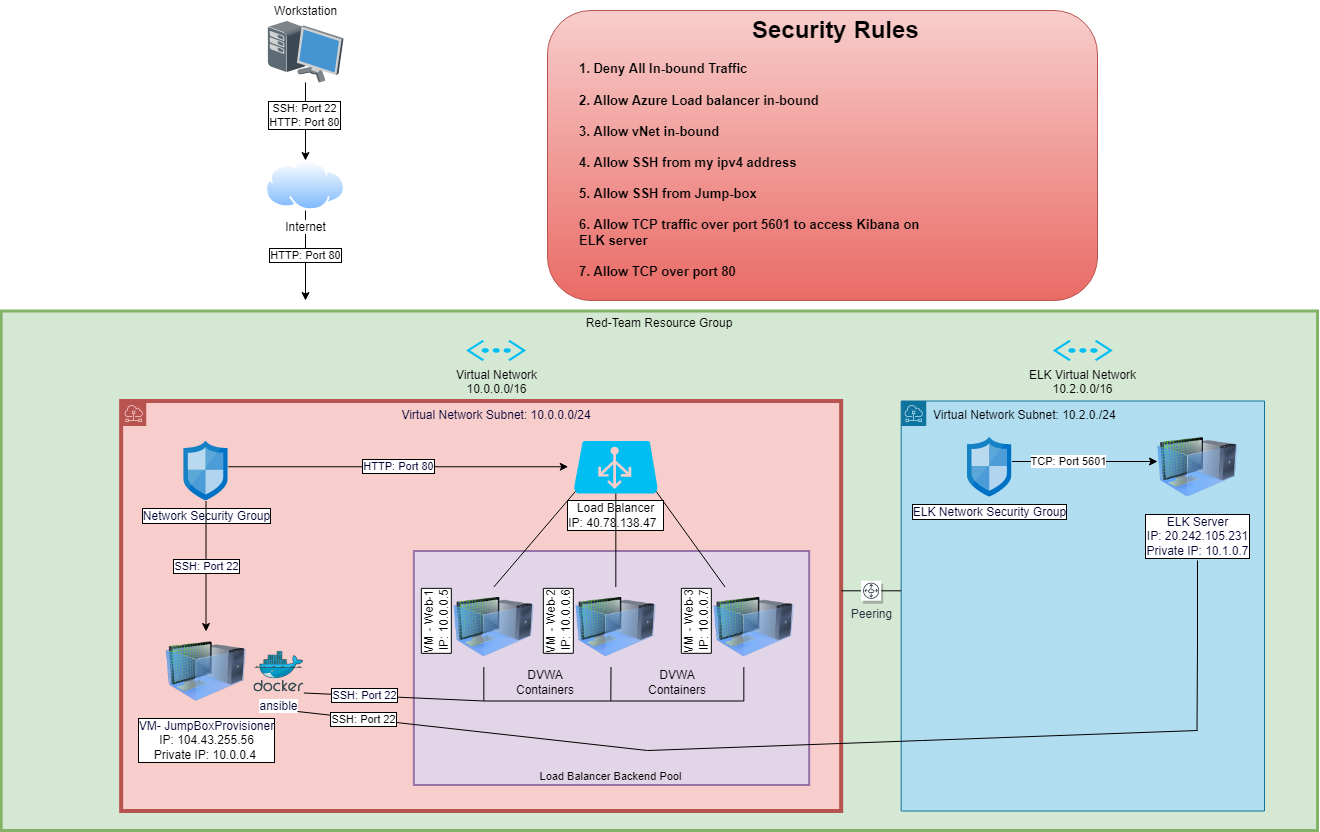


The files in this repository were used to configure the network depicted below.

These files have been tested and used to generate a live ELK deployment on Azure. They can be used to either recreate the entire deployment pictured above. Alternatively, select portions of the Configuration and YAML files may be used to install only certain pieces of it, such as Filebeat.
- Ansible Configuration
- Hosts
- Elk Installation
- Filebeat Configuration
- Filebeat Playbook
- Metricbeat Configuration
- Metricbeat Playbook
This document contains the following details:
- Description of the Topology
- Access Policies
- ELK Configuration
- Beats in Use
- Machines Being Monitored
- How to Use the Ansible Build
The main purpose of this network is to expose a load-balanced and monitored instance of DVWA, the D*mn Vulnerable Web Application.
Load balancing ensures that the application will be highly available, in addition to restricting inbound access to the network.
What aspect of security do load balancers protect?
- Load balancers are designed to take a load of traffic and distribute it across multiple resources preventing servers to overload.
- Load balancers play an important role in security by defending against distributed denial-of-service (DDoS) attacks.
What is the advantage of a jump box?
- Jump box virtual machine is exposed on the public network to withstand malicious threats and attacks. It is also used to manage other systems and hardens security, it is treated as a single entryway to a server group from within your security zone.
- The advantage of having a jump box is that it limits access to servers that are inaccessible over the network.
Integrating an ELK server allows users to easily monitor the vulnerable VMs for changes to
What does Filebeat watch for?
- Filebeat: collects data and logs about the file system.
What does Metricbeat record?
- Metricbeat: collects machine metrics and statisics, such as uptime.
The configuration details of each machine may be found below.
| Name | Function | IP Address | Operating System | Server |
|---|---|---|---|---|
| Jump Box | Gateway | 104.43.255.56; 10.0.0.1 | Linux | Ubuntu Server 18.04 LTS |
| Web-1 VM | DVWA Server | 10.0.0.5 | Linux | Ubuntu Server 18.04 LTS |
| Web-2 VM | DVWA Server | 10.0.0.6 | Linux | Ubuntu Server 18.04 LTS |
| Web-3 VM | DVWA Server | 10.0.0.7 | Linux | Ubuntu Server 18.04 LTS |
| ELK Server | Monitoring | 20.242.105.231; 10.1.0.7 | Linux | Ubuntu Server 18.04 LTS |
Note: In addition to above, Azure has provisioned a load balancer in front of all the machines except for Jump-Box. The load balancer’s target are organized into the following availability zones: Web-1, Web-2, Web-3
The machines on the internal network are not exposed to the public Internet.
Only the Jump Box Provisioner machine can accept connections from the Internet. Access to this machine is only allowed from the following IP addresses:
- Add whitelisted IP addresses: Local Admin IP, Workstation (My Personal IP)
Machines within the network can only be accessed by Workstation (My IP) and Jump Box Provisioner.
Which machine did you allow to access your ELK VM?
- Jump Box Provisioner IP: 10.0.0.4 via SSH Port 22
What was its IP address?
- Local Admin IP, Workstation (My Personal IP) via port TCP 5601
A summary of the access policies in place can be found in the table below.
| Name | Publicly Accessible | Allowed IP Addresses | Port | Server |
|---|---|---|---|---|
| Jump Box | Yes | Local Admin IP | SSH 22 | Ubuntu Server 18.04 LTS |
| Web-1 VM | No | 10.0.0.5 | SSH 22 | Ubuntu Server 18.04 LTS |
| Web-2 VM | No | 10.0.0.6 | SSH 22 | Ubuntu Server 18.04 LTS |
| Web-3 VM | No | 10.0.0.7 | SSH 22 | Ubuntu Server 18.04 LTS |
| Elk Server | No | Local Admin IP | TCP 5601 | Ubuntu Server 18.04 LTS |
Ansible was used to automate configuration of the ELK machine. No configuration was performed manually, which is advantageous because…
What is the main advantage of automating configuration with Ansible?
- Ansible is an open source tool with simple configuration management, cloud provisioning and application development.
- Allows you to deploy YAML playbooks.
Click here to view Steps on Creating an ELK Server.
We will create an ELK server within a virtual network. Specifically we will:
- Create a new vNet
- Create a Peer Network Connection
- Create a new VM
- Create an Ansible Playbook
- Downloading and Configuring the Container
- Launch and Expose the Container
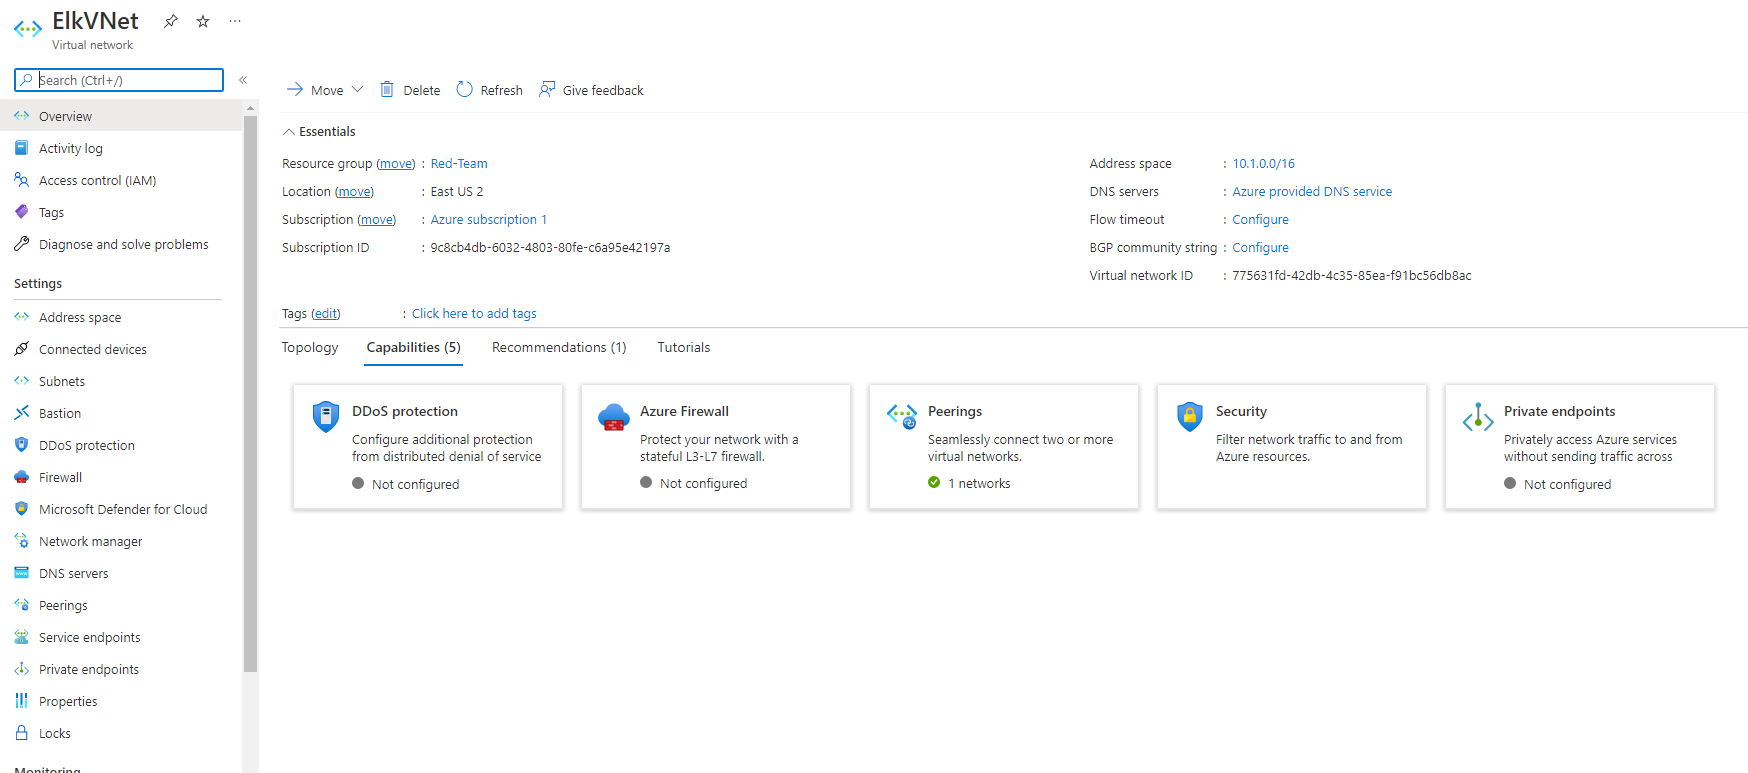
Creating a New vNet
-
Create a new vNet located in the same resouce group you have been using.
-
Make sure this vNet is located in a new region and not the same region as your other VM’s.
-
Leave the rest of the settings at default.
-
Notice, in this example that the IP addressing is automatically created a new network space of
10.1.0.0/16. If your network is different (10.1.0.0 or 10.3.0.0) it is ok as long as you accept the default settings. Azure automatically creates a network that will work.


-


Create a Peer Network Connection
-
Create a Peer network connection between your vNets. This will allow traffic to pass between you vNets and regions. This peer connection will make both a connection from your first vNet to your second vNet and a reverse connection from your second vNet back to your first vNet. This will allow traffic to pass in both directions.
-
Navigate to ‘Virtual Network’ in the Azure Portal.
-
Select your new vNet to view it’s details.
-
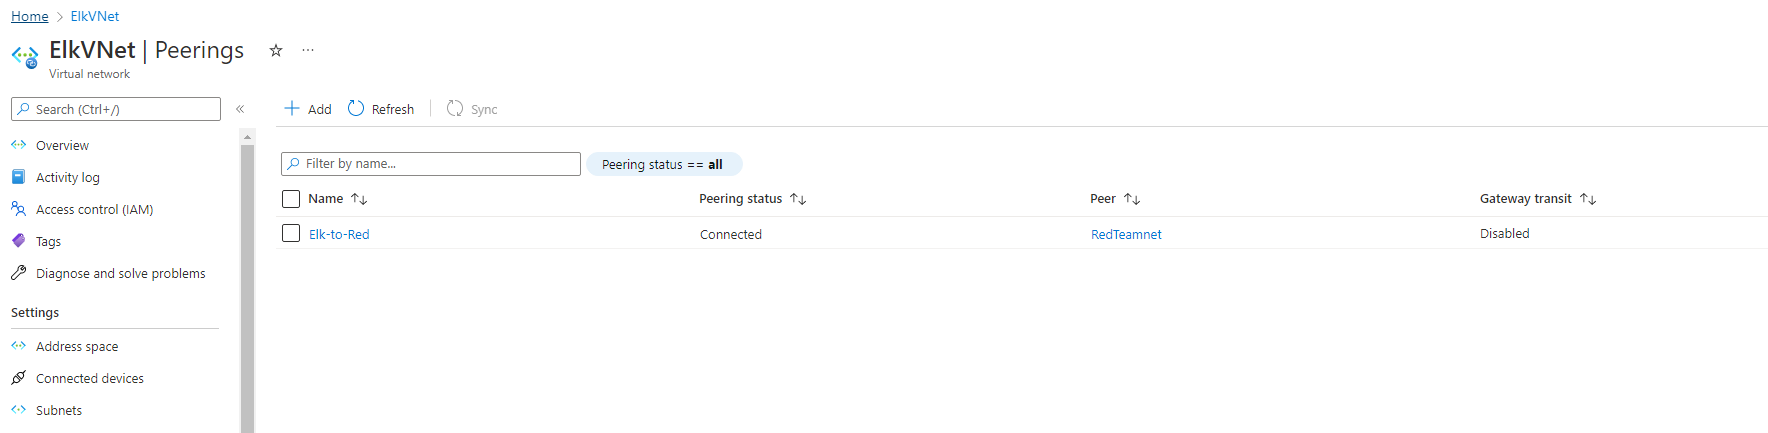
Under ‘Settings’ on the left side, select ‘Peerings’.
-
Click the
+ Addbutton to create a new Peering.

-
Make sure your new Peering has the following settings:
-
A unique name of the connection from your new vNet to your old vNet.
- Elk-to-Red would make sense
-
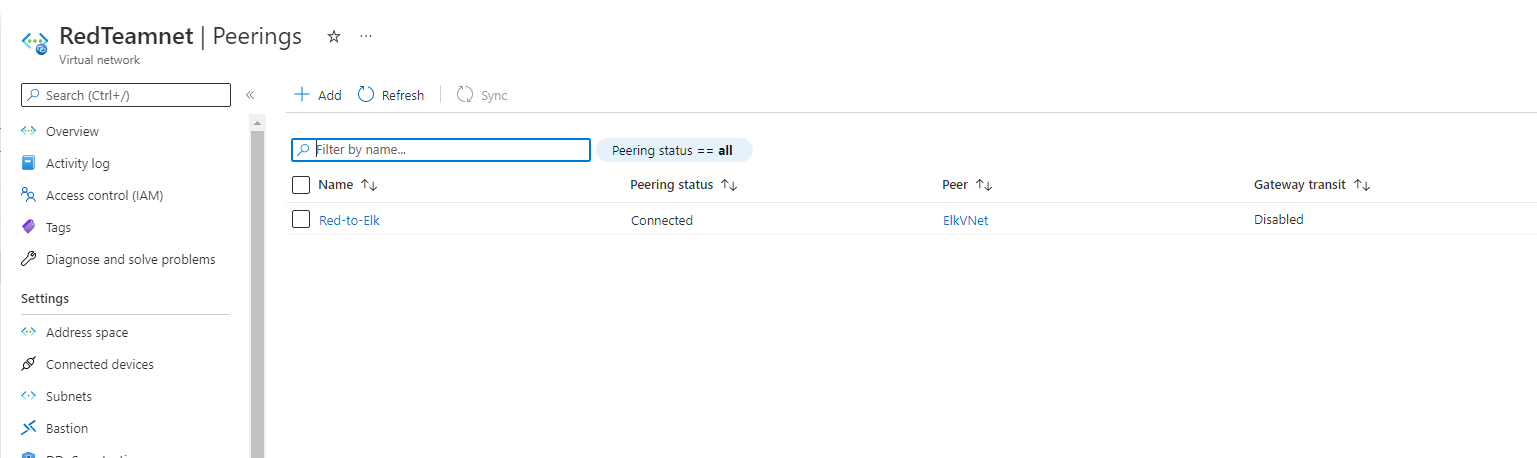
Choose your original RedTeam vNet in the dropdown labeled ‘Virtual Network’. This is the network you are connecting to your new vNet and you should only have one option.
-
Name the resulting connection from your RedTeam Vnet to your Elk vNet.
- Red-to-Elk would make sense
-
-
Leave all other settings at their defaults.
-

The following screenshots displays the results of the new Peering connections with your ELK vNet to your old vNet


Create a new VM
-
Creating a new VM
- Creating a new Ubuntu VM in your virtual network with the following configures:
- VM must have at least 4GB of RAM.
- IP address must be same as public IP address.
- The VM must be added to the new region in which you created your new vNet and create a new basic network security group for it.
- After creating the VM make sure that it works by connecting to it from your Jump-box using
ssh username@jump.box.ipssh RedAdmin@104.43.255.56
- Check your Ansible container:
sudo docker ps

- Locate the container name:
sudo docker container list -a

-
Start the container:
sudo docker container start peaceful_borg -
Attach the container:
sudo docker attach peaceful_borg

-
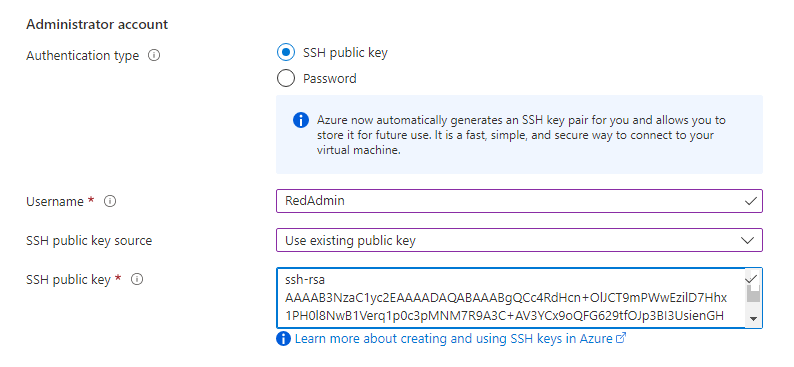
Copy the SSH key from the Ansible container on your jump box: cat ~/.ssh/id_rsa.pub
-
Configure a new VM using that SSH key.


Configuring Container
-
Downloading and Configuring Container
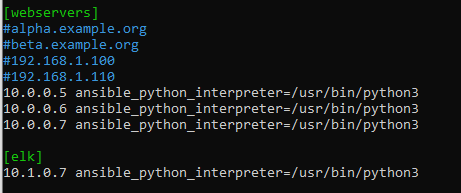
- Configure your hosts file inside ansible:
cd /etc/ansible/configurenano /etc/ansible/hostsand input the IP addresses of your VM withansible_python_intrepreter=/usr/bin/python3

-
Create a Playbook that installs Docker and configures the container
-
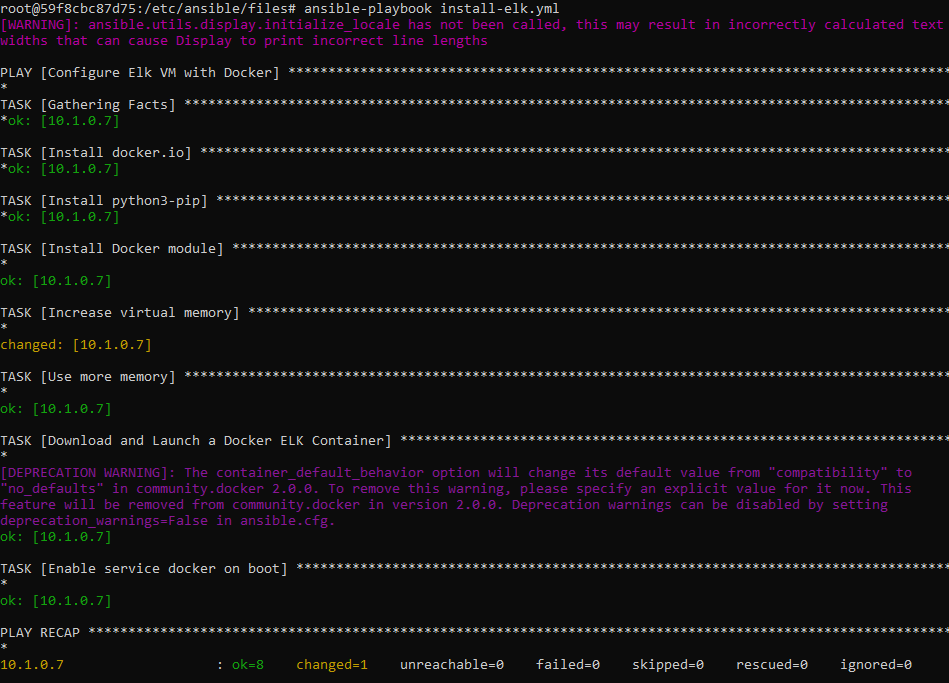
Run the ELK playbook:
ansible-playbook install-elk.yml
- Configure your hosts file inside ansible:

The following screenshot displays the result of running ELK installation YML file.

Creating ELK Playbook
The playbook implements the following tasks:
Configure ELK VM with Docker
       	      - name: Configure ELK VM with Docker
        	hosts: elk
                remote_user: RedAdmin
                become: true
                tasks:
Install Docker.io
       	      - name: Install docker.io
        	apt:
                  update_cache: yes
                  force_apt_get: yes
                  name: docker.io
                  state: present
Install Python3-pip
       	      - name: Install python3-pip
        	apt:
                  force_apt_get: yes
                  name: python3-pip
                  state: present
Install Docker Python Module
       	      - name: Install python3-pip
        	apt:
                  force_apt_get: yes
                  name: python3-pip
                  state: present
Increase virtual memory
       	      - name: Use more memory
        	sysctl:
                  name: vm.max_map_count
       		  value: 262144
      		  state: present
       		  reload: yes
Download and Launch a Docker ELK Container with ports 5601, 9200, 5044.
       	      - name: Download and launch a docker elk container
         	docker_container:
           	  name: elk
           	  image: sebp/elk:761
           	  state: started
           	  restart_policy: always
 		  ports:
          	    - 5601:5601
          	    - 9200:9200
          	    - 5044:5044
Enable Service Docker on Boot
- name: Enable service docker on boot
sysmd:
name: docker
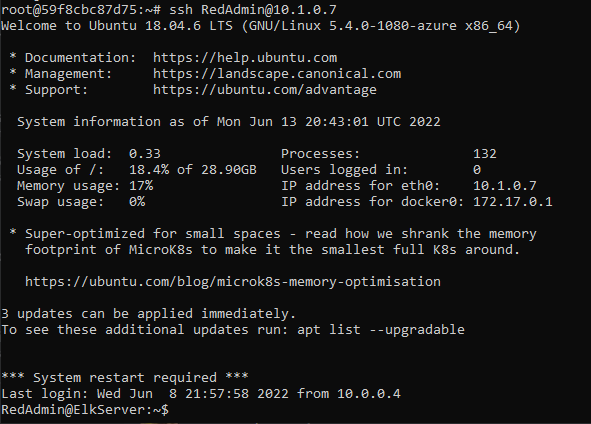
enabled: yesAfter the ELK container is installed, SSH into your container ssh username@your.ELK-VM.External.IP and double check that elk-docker container is running.
ssh RedAdmin@10.1.0.7The screenshot displays the results when successfully connected to ELK via SSH

The following screenshot displays the result of running docker ps after successfully configuring the ELK instance.

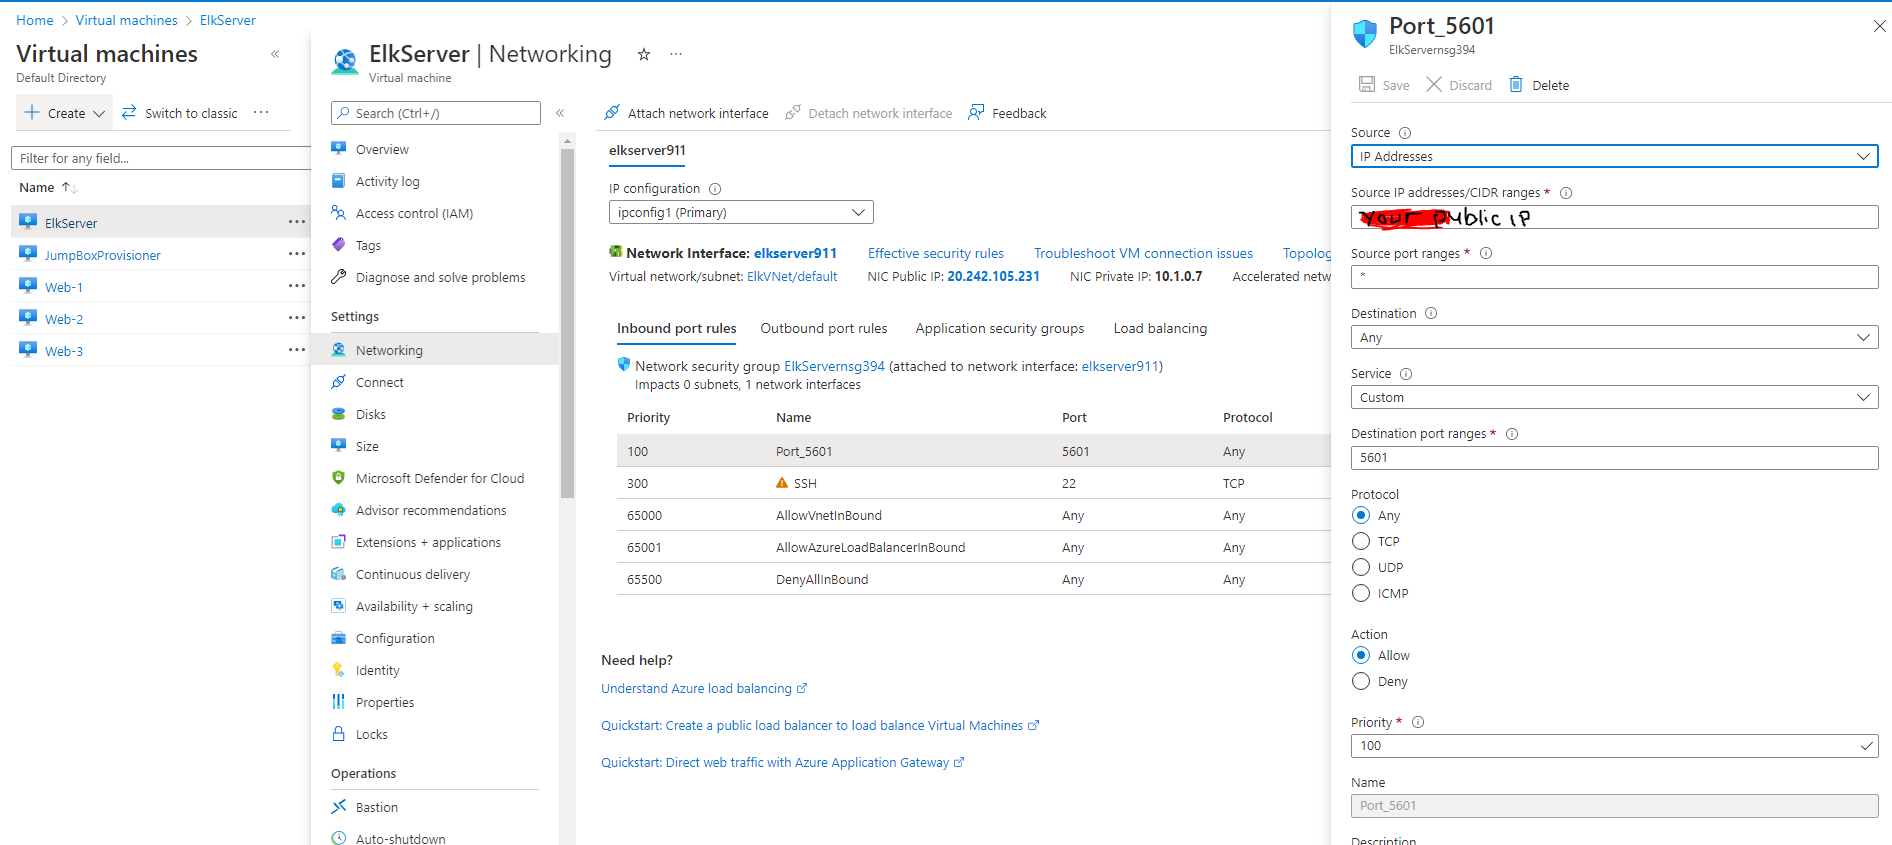
Restrict access to the ELK VM using Azure network security groups.
- You will need to add your public IP address to a whitelist. Opening virtual network existing NSG and create an incoming rule for your security group that allows TCP traffic port 5601 from your public IP address.

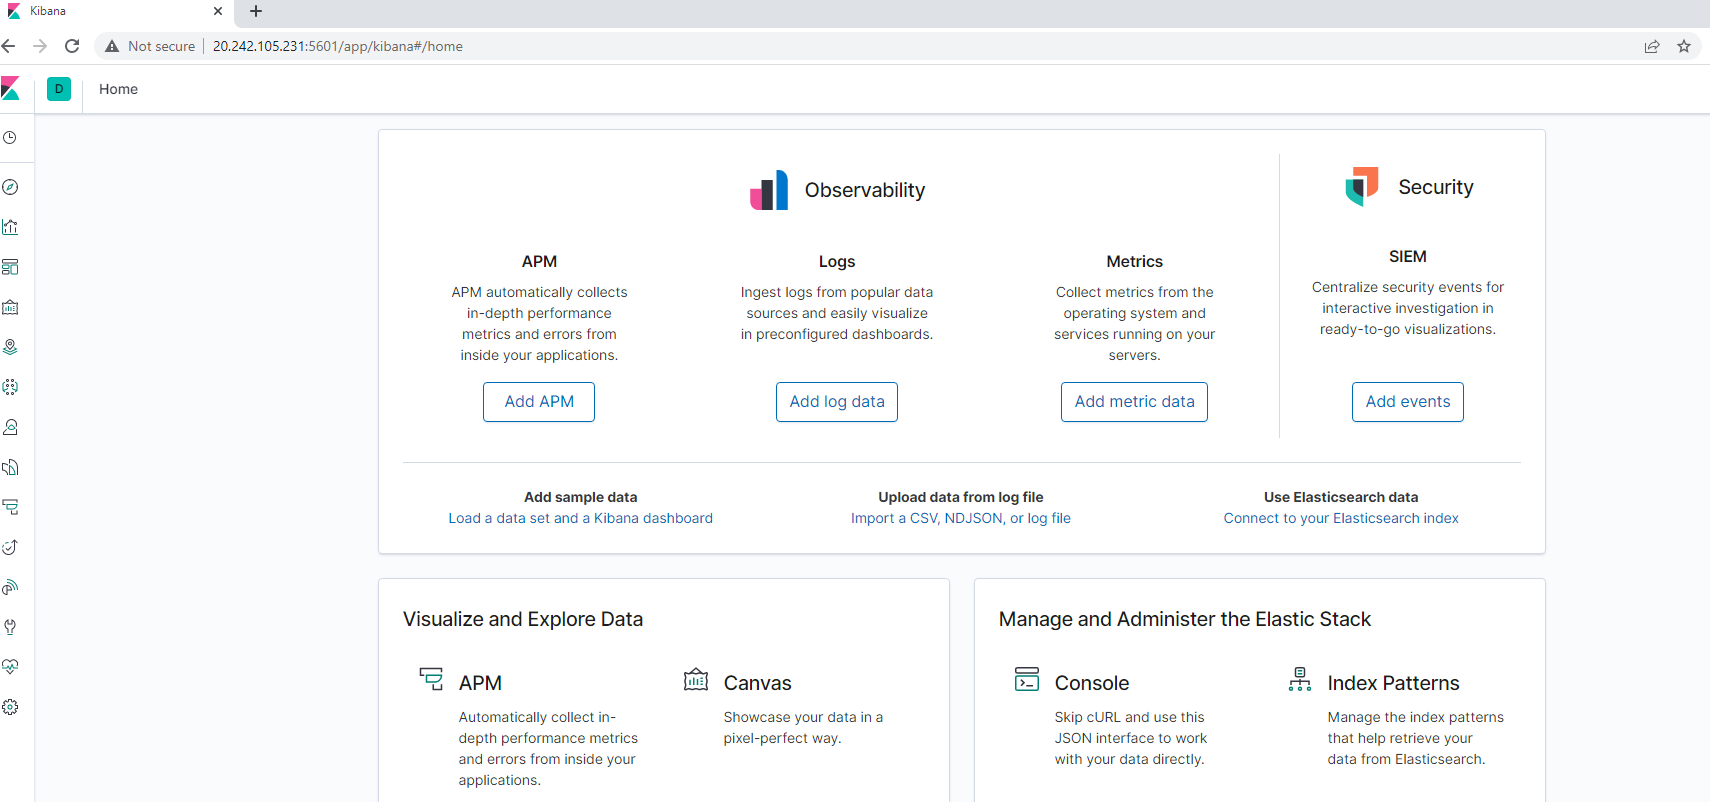
Verify that you can access your server by navigating to http://[your.ELK-VM.External.IP]:5601/app/kibana. Use the public IP address of your new VM.
http://20.242.105.231:5601/app/kibanaYou should see this page:

If you can get on this page, congratulations! You have successfully created an ELK Server!
This ELK server is configured to monitor the following machines:
- Web-1 VM: 10.0.0.5
- Web-2 VM: 10.0.0.6
- Web-3 VM: 10.0.0.7
We have installed the following Beats on these machines:
- Filebeat
- Metricbeat
These Beats allow us to collect the following information from each machine:
Filebeat:
- Filebeat monitors the specified log file or location, collects log events, and forwards them to Elasticsearch or Logstash for indexing.
- Filebeat is used to collect and send log files.
- Filebeat can be installed on almost any operating system, including Docker containers. It also contains internal modules for specific platforms such as Apache, MySQL, and Docker, including default configurations and Kibana objects for these platforms.
Metricbeat:
- Metricbeat helps monitor your server by collecting metrics and statistics that are collected and sent to the specific from the systems and services running on your server.
- Like Filebeat, Metricbeat supports an internal module for collecting statistics from a particular platform.
- You can use these modules and a subset called metric sets to configure how often Metricbeat collects metrics and the specific metrics it collects.
- We use it for failed SSH login attempts, sudo escalations, and CPU/RAM statistics.
Click here to view Steps on Creating Filebeat and Metricbeat.
We will create two tools that will help our ELK monitoring server which are Filebeat and Metricbeat. Specifically we will:
- Install Filebeat and Metricbeat on the Web VM’s
- Create the Filebeat and Metricbeat Configuration File
- Create a Filebeat and Metricbeat Installation Playbook
- Verify Filebeat and Metricbeat is Installed
Installing Filebeat and Metricbeat on DVWA Container
-
Make sure that ELK container is running:
-
Navigate to Kibana:
http://[your.ELK-VM.External.IP]:5601/app/kibana. Use public IP address of the ELK server that you created. -
If Kibana is not up and running, open a terminal on your PC and SSH into ELK Server and start your ELK-docker.
- Run
docker container list -a sudo docker start elk
- Run
-
-
Use ELK’s server GUI to navigate and install Filebeat instructions for Linux.
- Navigate to your ELK server’s IP:
- Click on
Add log data - Select
System Logs - Click on
DEBtab under Getting Started
- Click on
- Navigate to your ELK server’s IP:
-
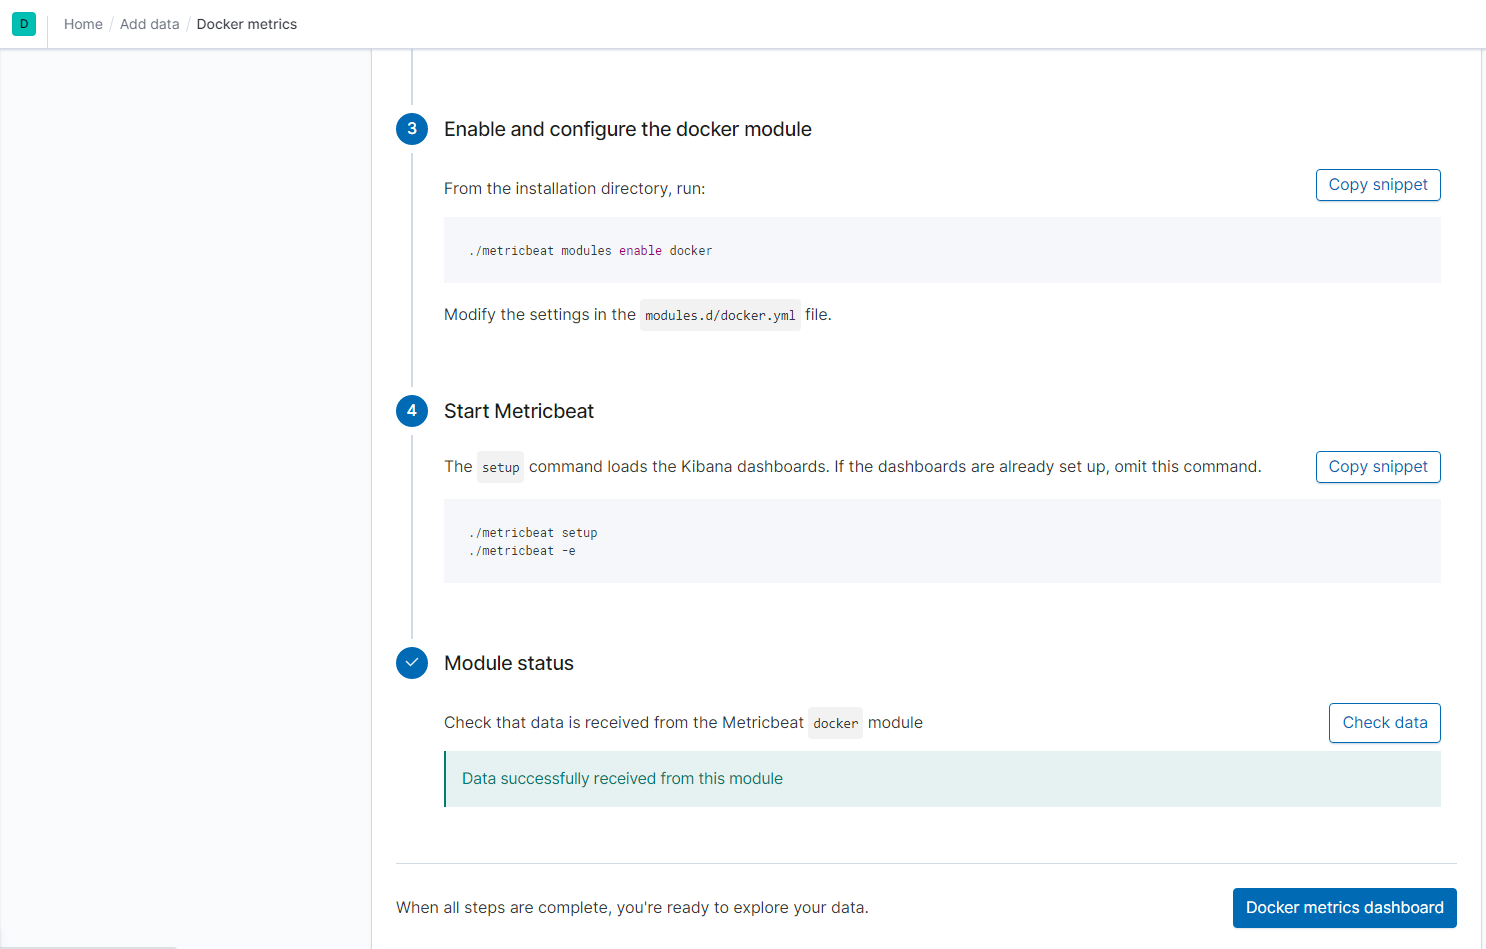
Using ELK’s server GUI to navigate and install Metricbeat instructions for Linux.
- Naviate to your ELK’s server’s IP:
- Click on ‘Add metric data`
- Select
Docker metrics - Click on
DEBtab under Getting Started
- Naviate to your ELK’s server’s IP:
Create Filebeat and Metricbeat Configuration File
-
We will create and edit the Filebeat and Metricbeat configuration file.
- Start by opening a terminal and SSH into your Jump-box and start up the Ansible container.
- Navigate to our Ansible container file and edit the Filebeat Configuration and Metricbeat Configuration.yml configuration files.
- Username will be
elasticand the password ischangeme
Scroll down to line #1106 and replace the IP address with the IP address of your ELK VM.
	output.elasticsearch:
	hosts: ["10.1.0.7:9200"]
	username: "elastic"
	password: "changeme"
Scroll down to line #1806 and replace the IP address with the IP address of your ELK VM.
  	setup.kibana:
   	host: "10.1.0.7:5601"
When finished save both files in /etc/ansible/files
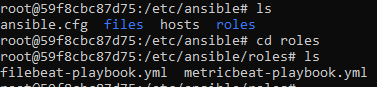
Creating Filebeat and Metricbeat Installation Playbook
- Create Filebeat and Metricbeat Playbooks and save it in
/etc/ansible/rolesdirectory.

First, nano filebeat-playbook.yml with Filebeat template below:
- name: installing and launching filebeat
  hosts: webservers
  become: yes
  tasks:

  - name: download filebeat deb
    command: curl -L -O curl -L -O https://artifacts.elastic.co/downloads/beats/filebeat/filebeat-7.6.1-amd64.deb

  - name: install filebeat deb
    command: dpkg -i filebeat-7.6.1-amd64.deb

  - name: drop in filebeat.yml
    copy:
      src: /etc/ansible/files/filebeat-config.yml
      dest: /etc/filebeat/filebeat.yml

  - name: enable and configure system module
    command: filebeat modules enable system

  - name: setup filebeat
    command: filebeat setup

  - name: start filebeat service
    command: service filebeat start

  - name: enable service filebeat on boot
    systemd:
      name: filebeat
      enabled: yes
Next, nano metricbeat-playbook.yml with Metricbeat template below:
- name: Install metric beat
  hosts: webservers
  become: true
  tasks:
    # Use command module
  - name: Download metricbeat
    command: curl -L -O https://artifacts.elastic.co/downloads/beats/metricbeat/metricbeat-7.6.1-amd64.deb

    # Use command module
  - name: install metricbeat
    command: dpkg -i metricbeat-7.6.1-amd64.deb

    # Use copy module
  - name: drop in metricbeat config
    copy:
      src: /etc/ansible/files/metricbeat-config.yml
      dest: /etc/metricbeat/metricbeat.yml

    # Use command module
  - name: enable and configure docker module for metric beat
    command: metricbeat modules enable docker

    # Use command module
  - name: setup metric beat
    command: metricbeat setup

    # Use command module
  - name: start metric beat
    command: service metricbeat start

    # Use systemd module
  - name: enable service metricbeat on boot
    systemd:
      name: metricbeat
      enabled: yes
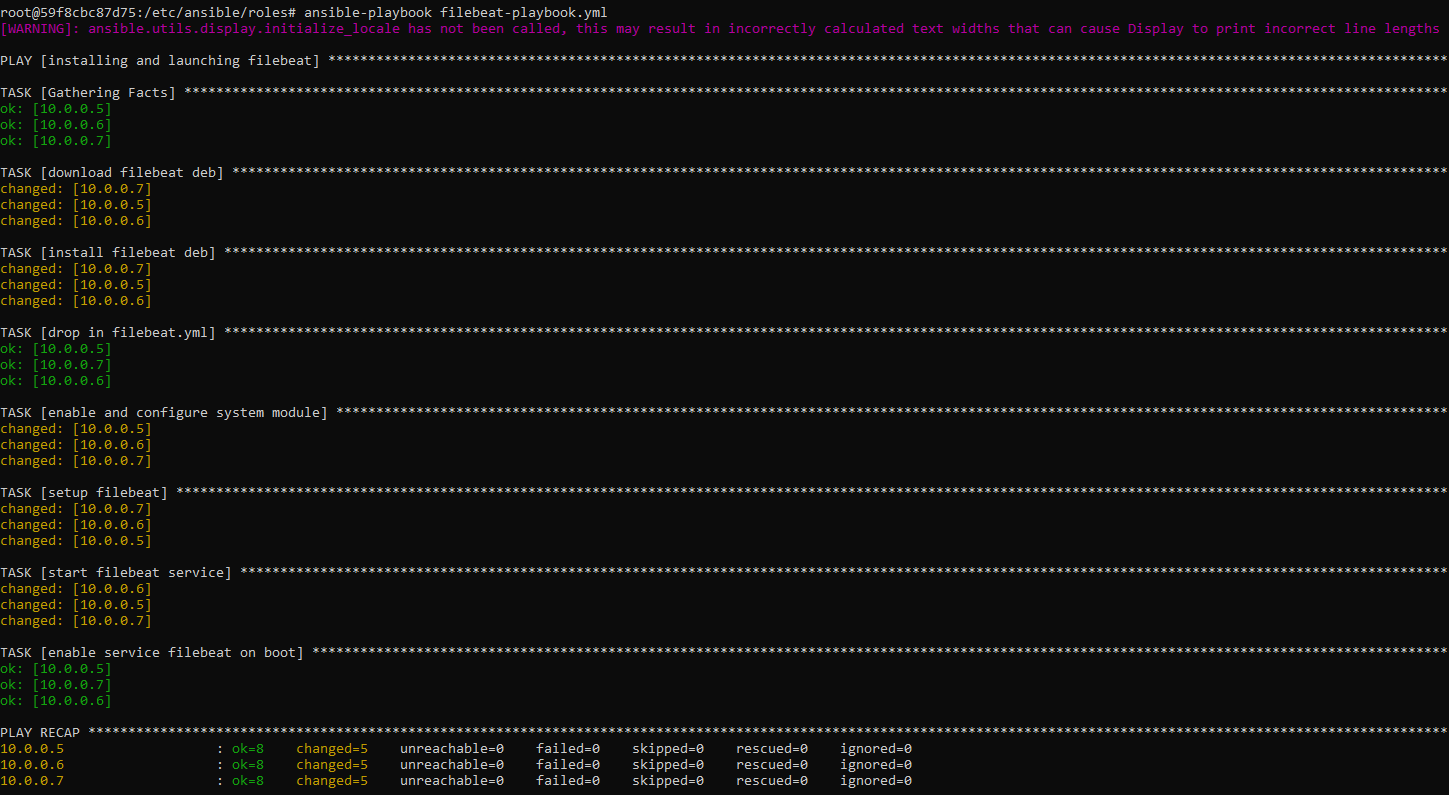
- Run both playbooks to confirm that it works.
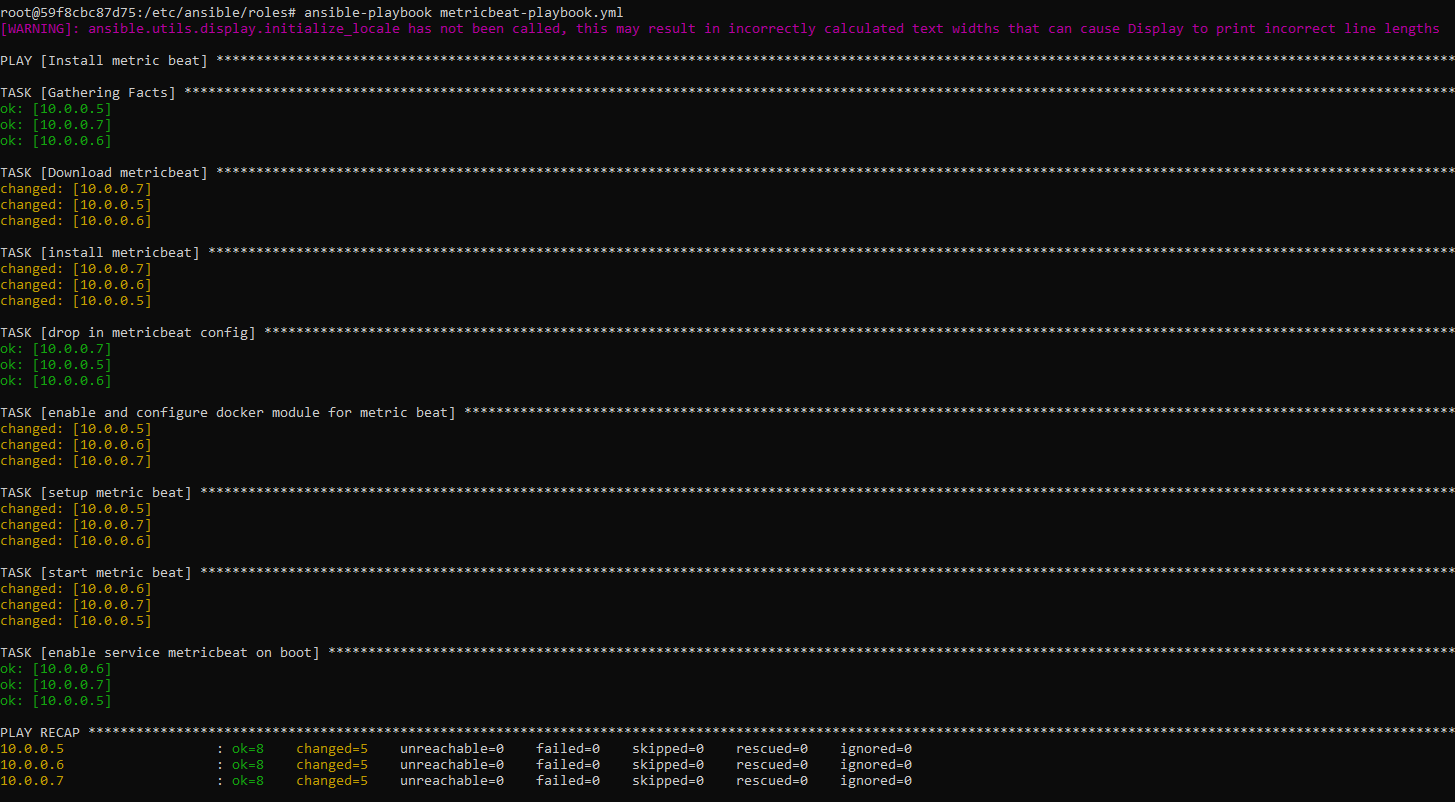
ansible-playbook filebeat-playbook.ymlandansible-playbook metricbeat-playbook.yml
This screenshot displays the results for filebeat-playbook:

This screenshot displays the results for metricbeat-playbook:

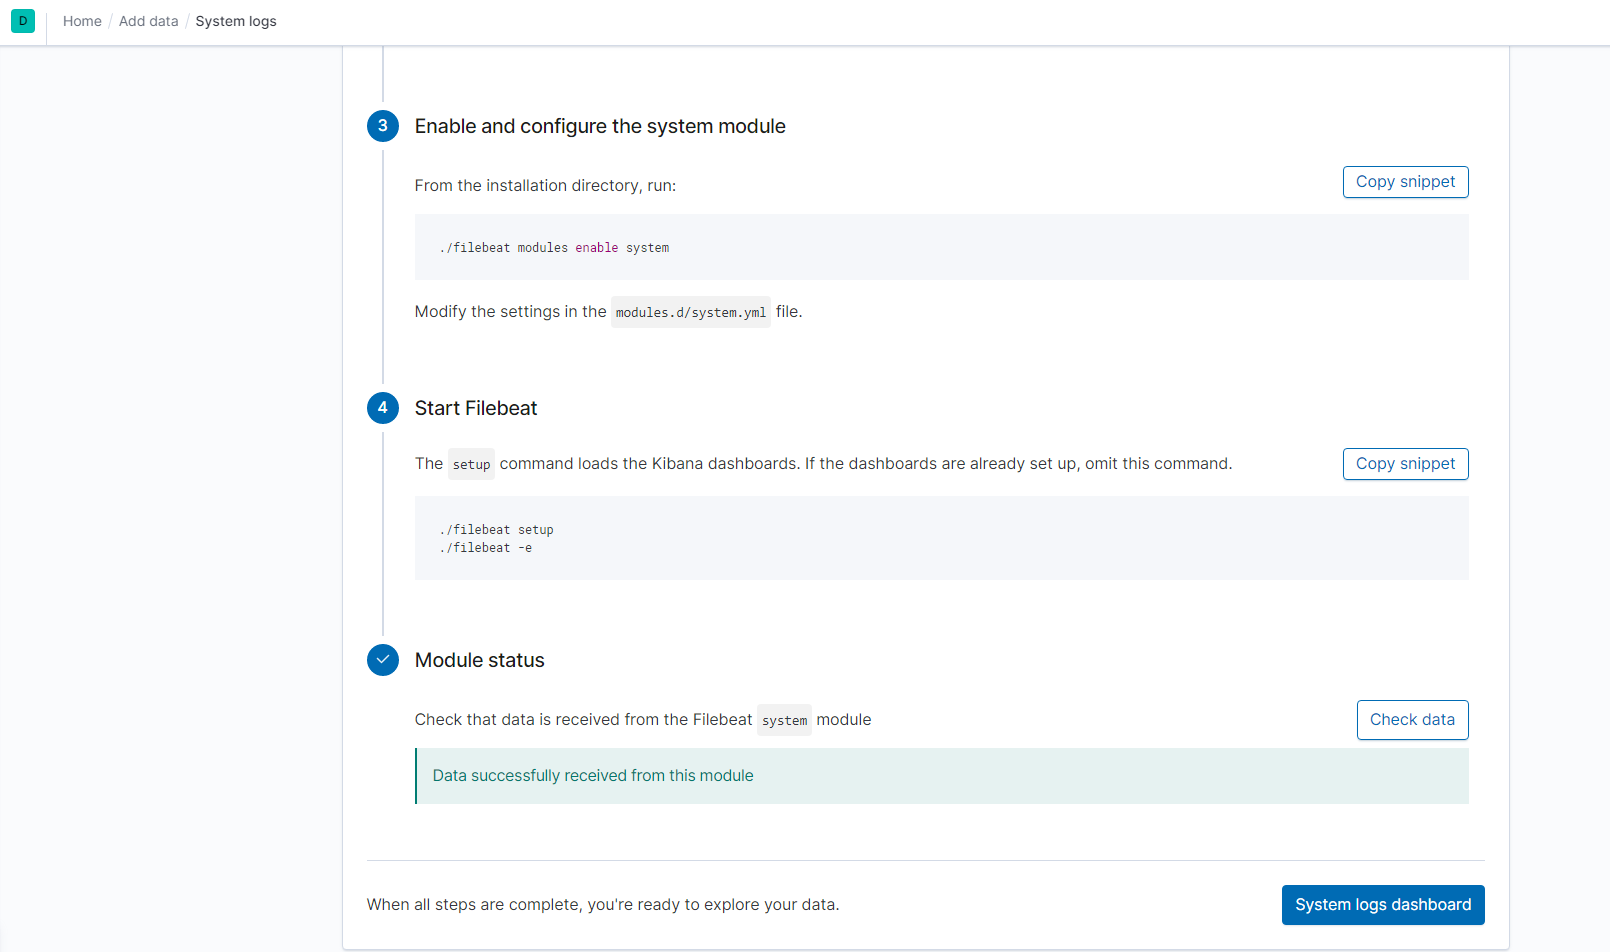
- Verify that the playbook works by navigating to the Filebeat and Metricbeat installation page on the ELK Server GUI and under
Step 5: Module Statusand click onCheck Data.
The screenshot display the results of ELK stack successfully receiving logs.

The screenshot display the results of ELK stack successfully receiving metrics.

In order to use the playbook, you will need to have an Ansible control node already configured. Assuming you have such a control node provisioned:
SSH into the control node and follow the steps below:
- Copy the Elk Installation, Filebeat Configuration and Metricbeat Configuration to Ansible container folder
/etc/ansible/files/

- Copy the Filebeat Playbook and Metricbeat Playbook to Ansible container folder
/etc/ansible/roles
- Update the hosts file
/etc/ansible/hoststo includeELK server IP 10.1.0.7

- Run the ELK, Filebeat and Metricbeat playbooks:
	ansible-playbook install-elk.yml
	ansible-playbook filebeat-playbook.yml
	ansible-playbook metricbeat-playbook.yml
- Navigate to
http://[your.ELK-VM.External.IP]:5601/app/kibanato check that the installation worked as expected.
Click here to view how to verify Elk Server is working with Filebeat and Metricbeat.
We will verify ELK Server is working with Filebeat and Metricbeat by pulling logs and metrics from our web VM servers.
Three tasks is implemented to test if the ELK server is working by pulling both logs and metrics from our web VM servers we create by:
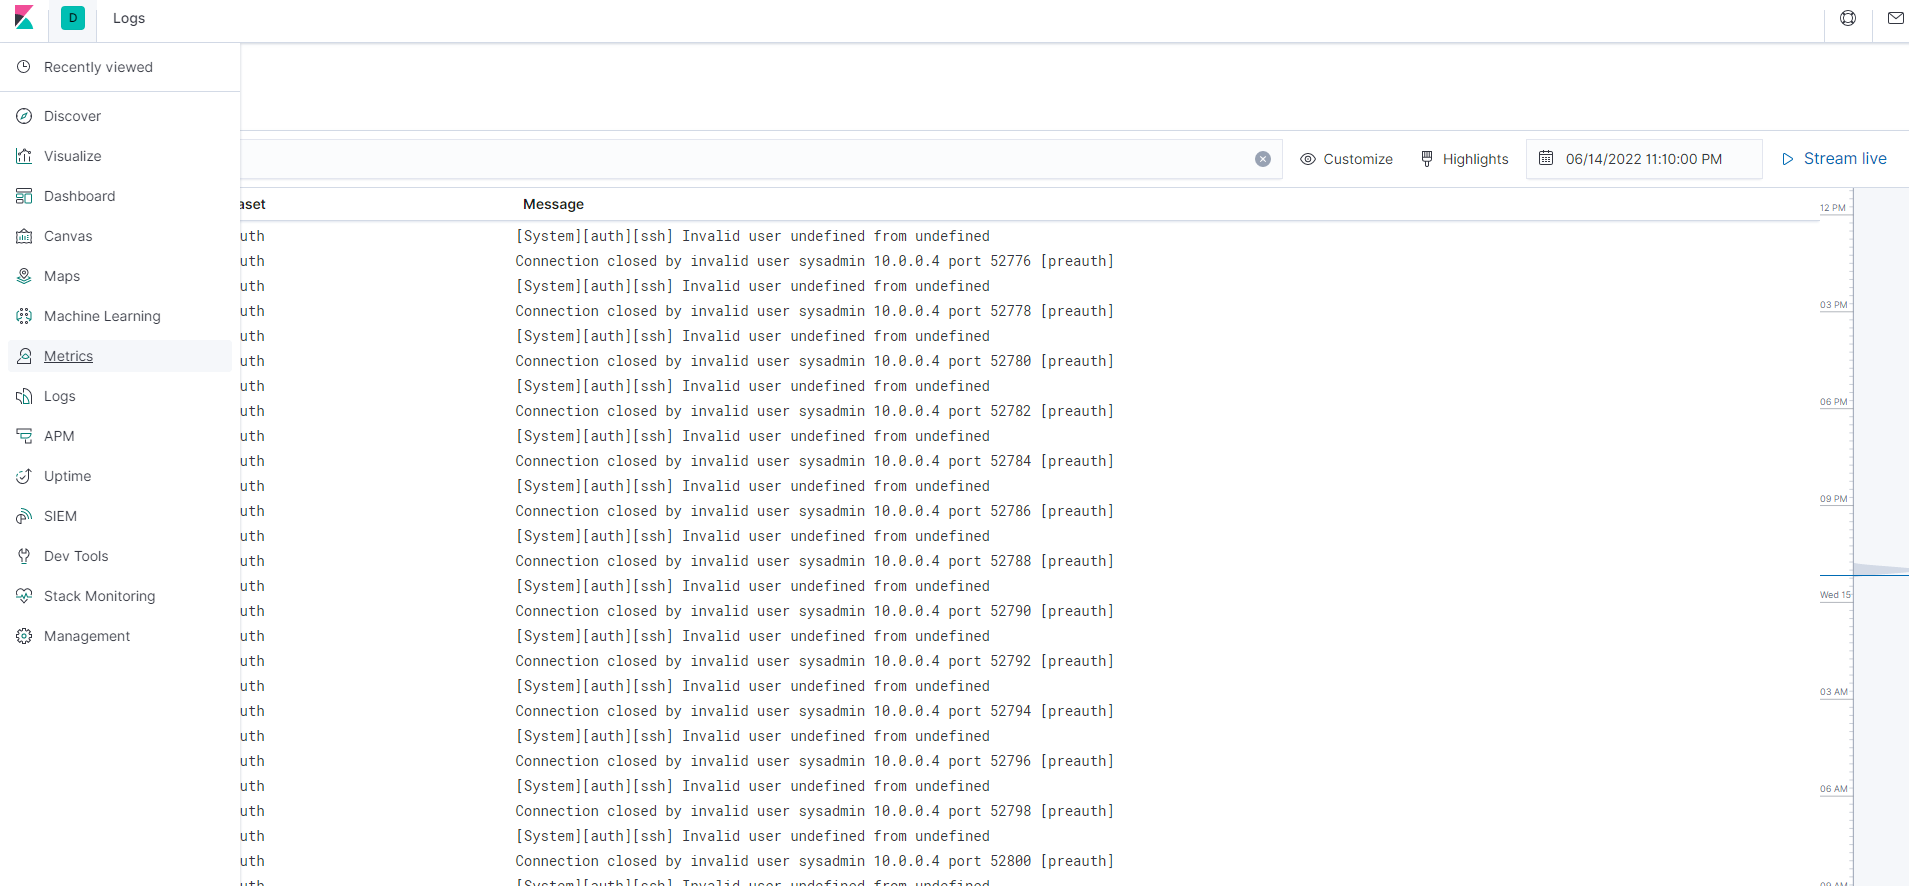
1. SSH Barrage: Generating a high amount of failed SSH login attempts.
- Run
ssh username@ip.of.web.vm - An error should occur as shown in the screenshot below:

- Write a script that creates 1000 login attempts on the webserver 10.0.0.5.
   for i in {1..1000};
   do
    ssh sysadmin@10.0.0.5;
done;- Write a script that creates a nested loop that generates SSH login attempts across all 3 of your web-servers VM’s.
   while true;
   do
    for i in {5..7};
     do
      ssh sysadmin@10.0.0.$i;
     done;
   done
The screenshot display the results of Kibana logs when running the scripts.

2. Linux Stress: Generating a high amount of CPU usage on VM servers to verify that Kibana picks up data.
- While in Jump-box go inside the container and login to your web server VM.
   $sudo docker container list -a
   $sudo docker start [CONTAINER NAME]
$sudo docker attach [CONTAINER NAME]- SSH into your web VM:
ssh username@web.ip.vm - Run command:
sudo apt install stresswhich installs a stress program. - Run command:
sudo stress --cpu 1which allows stress to run for a minute. - View metrics on Kibana which will show CPU usage on screenshot display below:

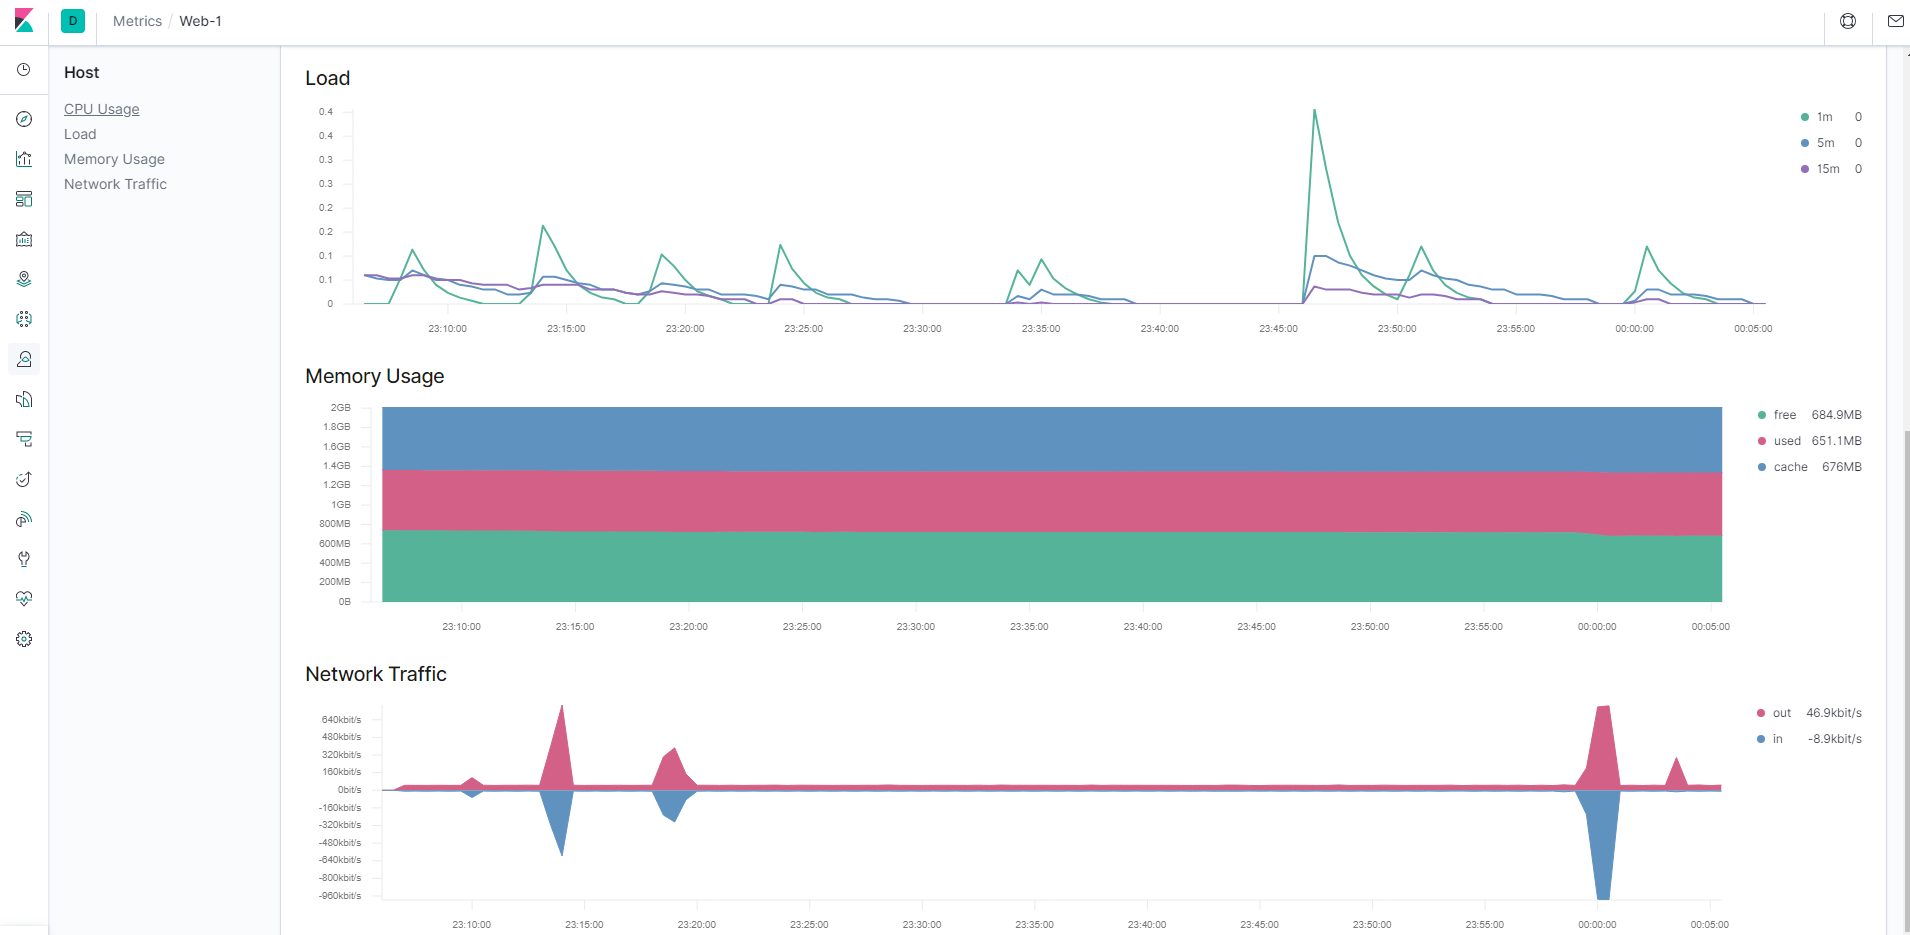
3. wget-DoS: Generating a high amount of web requests to our VM servers to make sure that Kibana picks up data.
- Log into Jump-Box VM and run command
wget ip.of.web.vm: you will receive an index.html file downloaded from your web VM to your jump-box. - Write a loop script that will create 1000 web requests on the 10.0.0.5 server and downloaded files onto your jump-box.
   for i in {1..1000};
   do
    wget 10.0.0.5;
done;- View metrics on Kibana which will show the Load, Memory Usage, and Network Traffic on screenshot display below:

As a Bonus, provide the specific commands the user will need to run to download the playbook, update the files, etc.
| Commands | Explanation |
|---|---|
| ssh username@[Jump.box.IP] | Connect to Jump-Box VM |
| ssh-keygen | Generates a public SSH key to access (Needed to set up VM) |
| cat ~./ssh/id_rsa.pub | Read the SSH keygen |
| docker ps | Docker command to list running containers |
| docker start [CONTAINER] | Start a container |
| docker attach [CONTAINER] | Attaches to a running container |
| docker stop [CONTAINER] | Stop a running container |
| cd /etc/ansible | Change directory to /etc/ansible |
| nano /etc/ansible/hosts | Edit hosts file |
| nano /etc/ansible/ansible.cfg | Edit ansible configuration file |
| nano filebeat-config.yml | Edit Filebeat configuration yml file |
| nano filebeat-playbook.yml | Edit Filebeat playbook yml file |
| nano metricbeat-config.yml | Edit Metricbeat configuration yml file |
| nano metricbeat-playbook.yml | Edit Metricbeat playbook yml file |
| ansible-playbook [location][filename.yml] | Execute ansible playbook |
| curl [options/URL] | Client URL: Enables data transfer over various network protocols |
| dpkg -i [package-file] | Package manager for Debian: -i: installing package file |
| exit | Cause the shell to exit |
 https://github.com/raospiratory/Project-1—Automated-ELK-Stack-Deployment