We consider an optical neural network (ONN) that uses saturable absorption (SA) to realise the nonlinaer activation functions. A README is not the setting for equations, but in brief this system allows us to perform both forward and backward propagation in a single pass with only passive optical elements. A rough justification for this is below, but for details please see the paper!
How does optical backpropagation work?
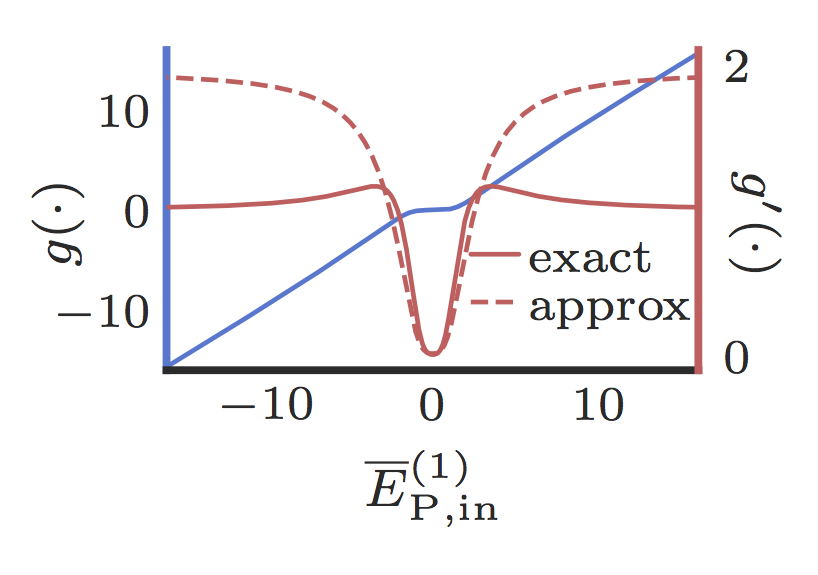
Recalling the backpropagation algorithm, obtaining the gradient of the loss function at each neuron requires multiplying the back-propagating loss with the gradient of the neuron’s response to the forward-propagating signal. SA in a pump-probe set up has a nonlinear response to the strong pump (i.e. forward propagating signal) and a weak linear response to the probe (i.e. back-propagating gradients). Within the unsaturated (nonlinear) region of the SA response curve, this probe response is a good approximation of the gradient of the pump response (see Fig. 1), therefore it provides us with the necessary gradient backpropagation.
Fig. 1: Transmission and exact and optically approximated gradients of an SA nonlinearity with an optical depth of 10.
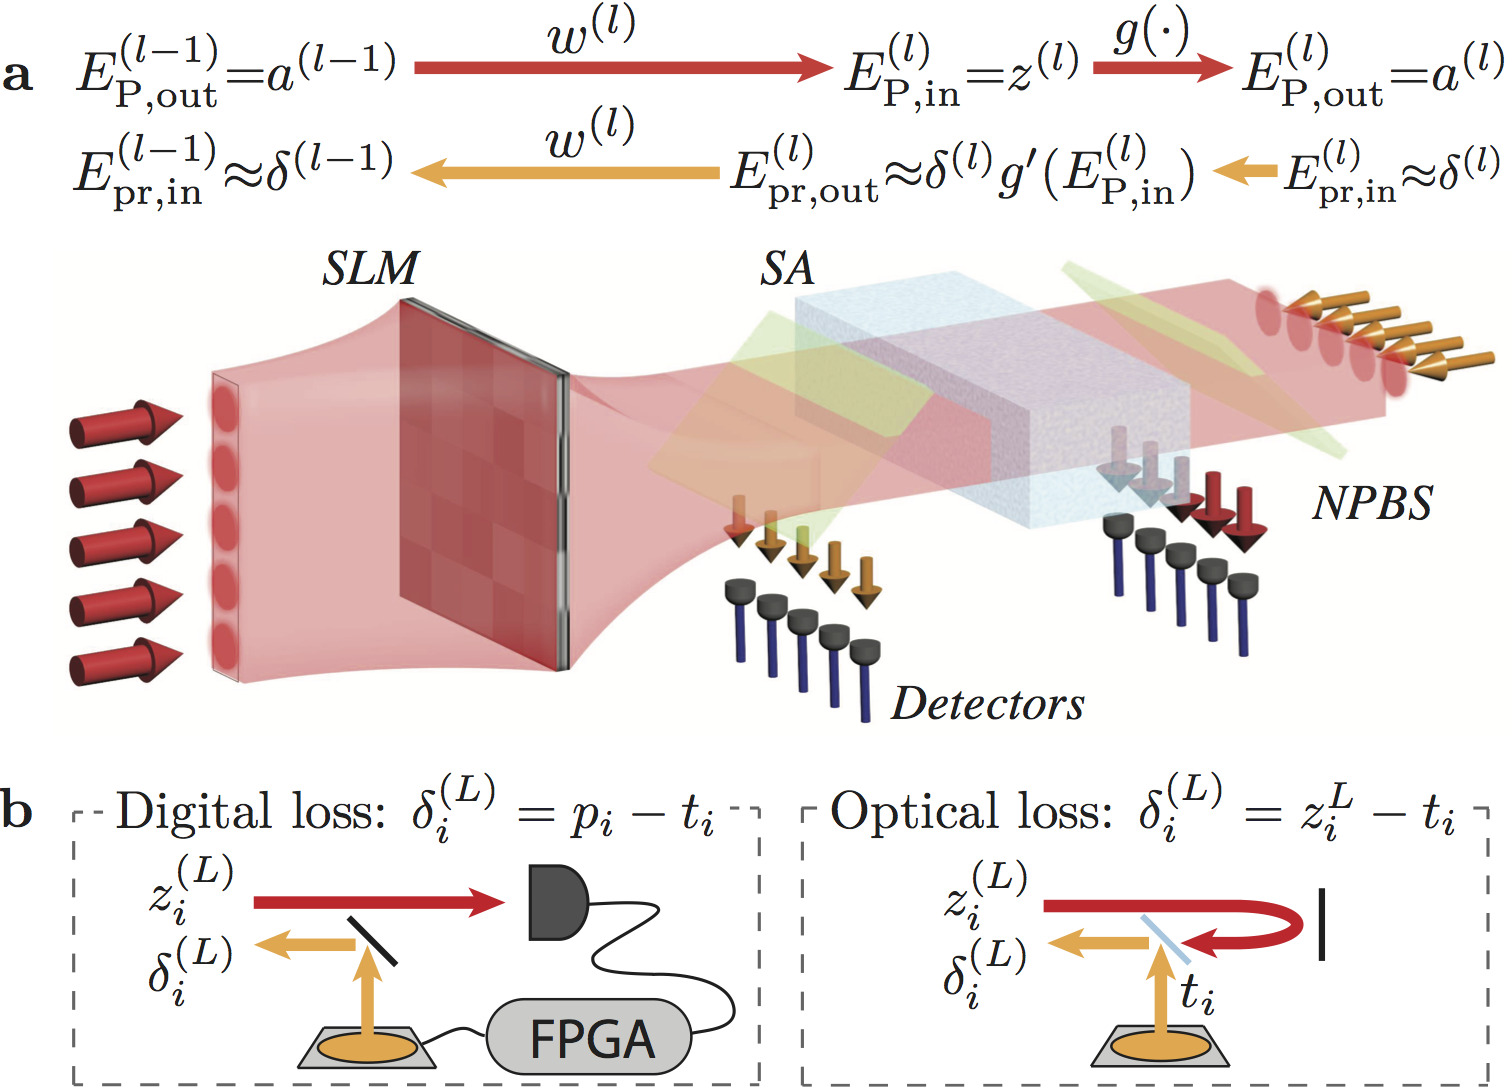
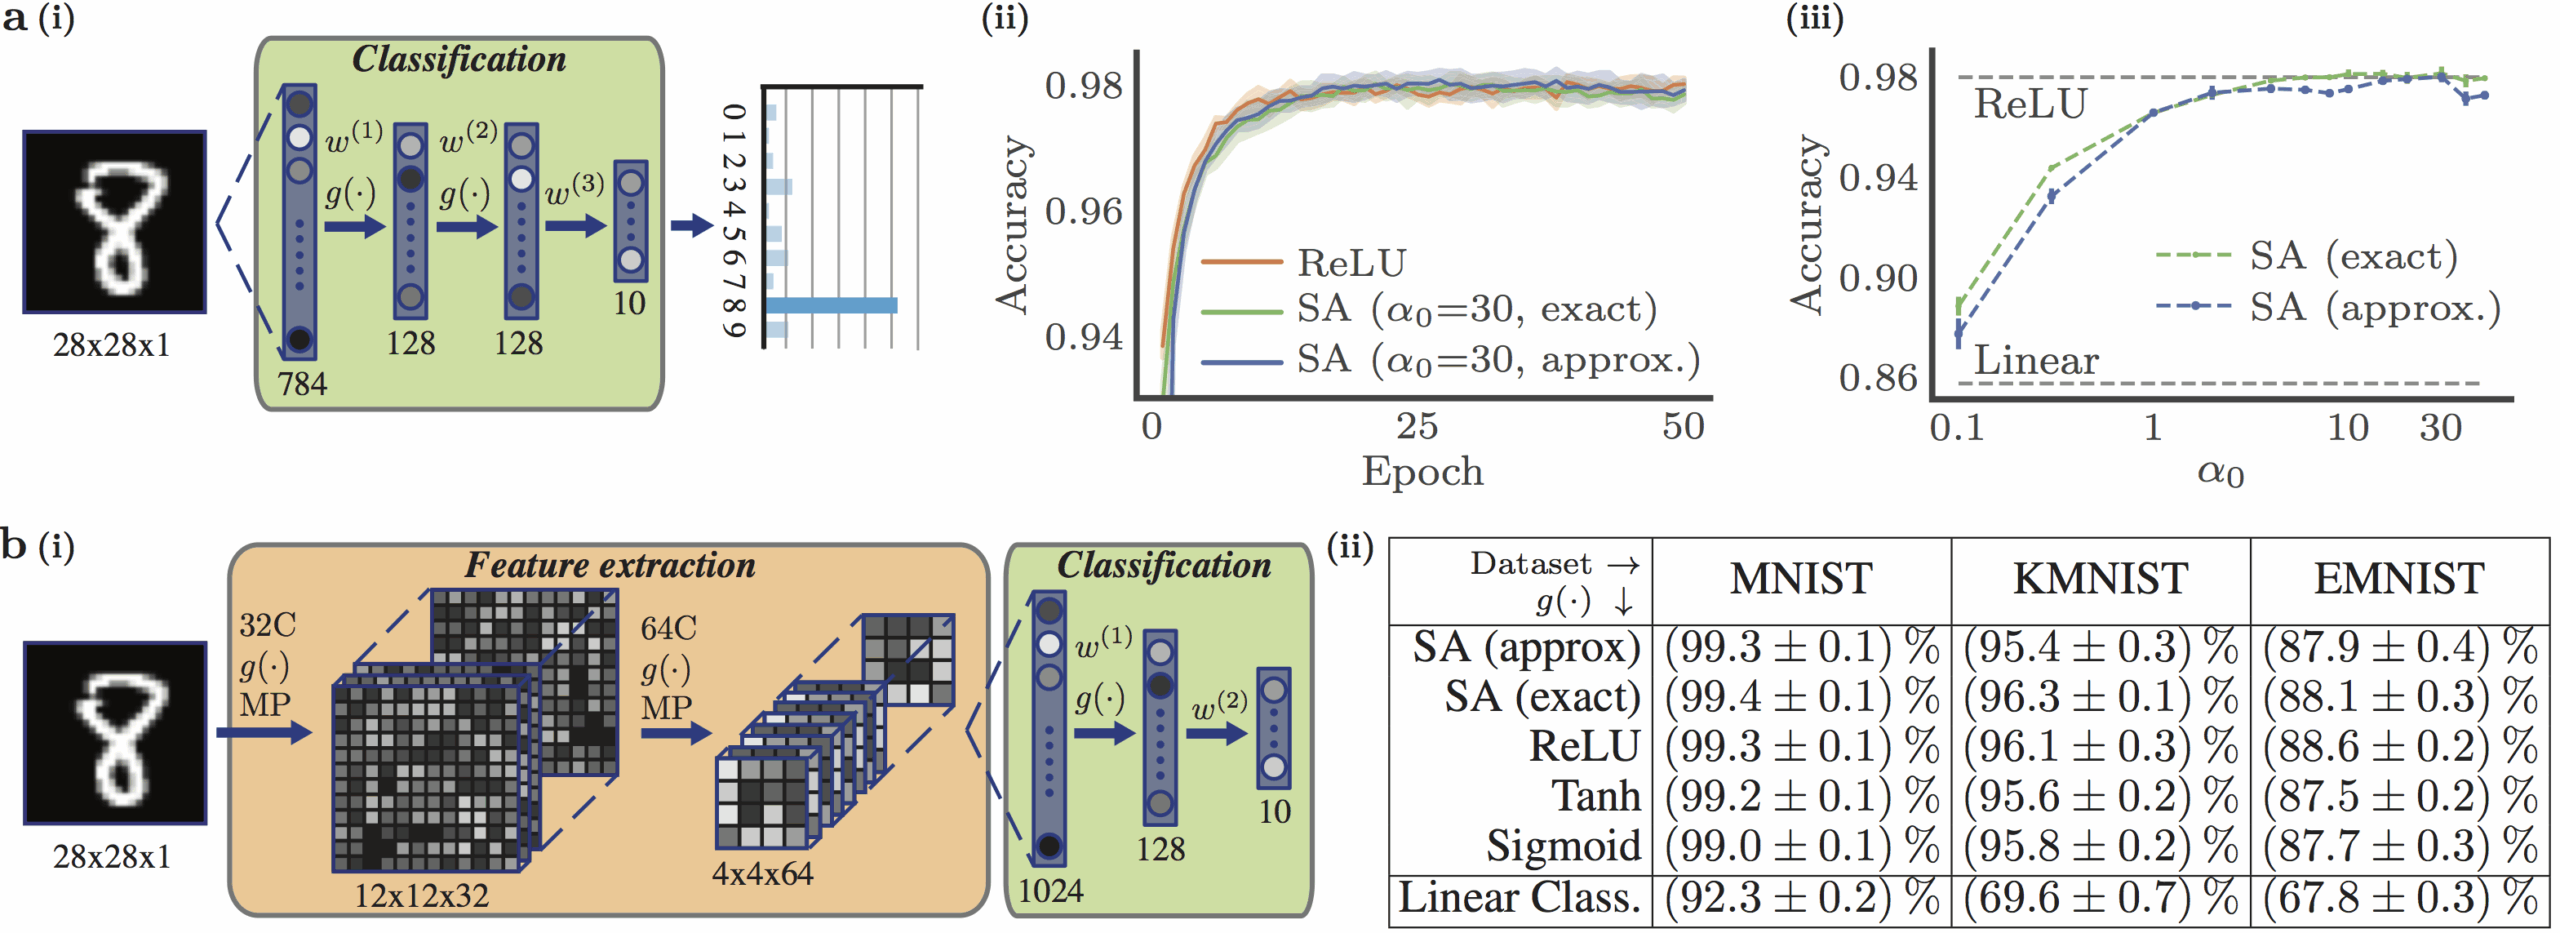
In this way, we can build all-optical neural networks, with information encoded in the intensity/amplitude of different electric field modes. Linear operations can be realised in an integrated or free-space setting, with SA nonlinear units and tapped off light providing access to the forward propagating neuron inputs/activations and backwards propagating gradients (see Fig. 2). This repository provides code to simulate the performance of these ONNs, and they are found to produce equivalent performance to computationally trained networks (ANNs) (see Fig. 3).
Fig. 2: One possible free-space implementation of a single network layer.
Fig. 3: Trained performance of ONNs vs ANNs.
Requirements
The only significant dependency beyond standard packages found in most Python distributions (e.g. numpy, matplotlib etc) is PyTorch (the experiments were performed with version 1.2.0). Additionally, using the seaborn library will make all your plot’s nicer!
For completeness, full details of the environment used in the experiments are in the provided req.txt file.
Experiments
Scripts to train networks like those in the paper are provided in the experiments folder.
In general, we consider MLPs and CNNs. For each these there are two scripts, train_ONN.py and train_ANN.py, for training optical networks and a computational baseline, respectively. It is straightforward to modify the arguments of each to train various network architectures and implementations.
Reference
If you find this work or the associated paper useful, it can be cited as below.
@article{guo2019aonn,
  title={Backpropagation through nonlinear units for all-optical training of neural networks},
  author={Guo, Xianxin and Barrett, Thomas D and Whang, Zhiming M and Lvovsky, AI},
  journal={arXiv preprint arXiv:1912.12256},
  year={2019}
}
This package provides a very rough GDK equivalent for CTK. This is not
intended to be a parity of GDK in any way, rather this package simply fulfills
the terminal drawing and basic event systems required by CTK.
Unless you’re using CTK, you should really be using TCell instead of CDK
directly.
Notice
This project should not be used for any purpose other than intellectual
curiosity. This status is reflected in the tagged versioning of this trunk
branch, v0.5.x, ie: still experimental and unfinished, yet getting near the
word “done”.
Installing
$ go get github.com/go-curses/cdk
Building
A makefile has been included to assist in the development workflow.
$ make help
usage: make [target]

qa targets:
  vet         - run go vet command
  test        - perform all available tests
  cover       - perform all available tests with coverage report

cleanup targets:
  clean       - cleans package and built files
  clean-logs  - cleans *.log from the project

go.mod helpers:
  local       - add go.mod local package replacements
  unlocal     - remove go.mod local package replacements

build targets:
  examples    - builds all examples
  build       - build test for main cdk package
  dev         - build helloworld with profiling

run targets:
  run         - run the dev build (sanely handle crashes)
  profile.cpu - run the dev build and profile CPU
  profile.mem - run the dev build and profile memory
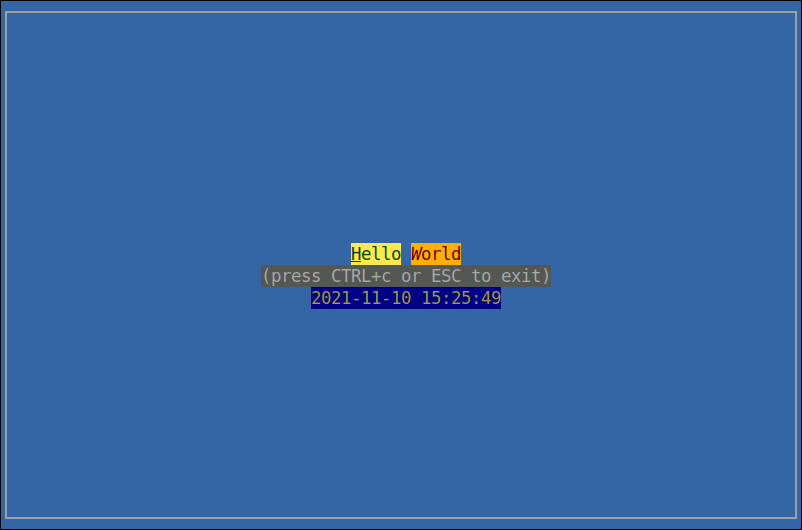
Hello World
An example CDK application demonstrating basic usage and a cdk.Window with customized draw handler.
$ make examples
# cleaning *.log files
# cleaning *.out files
# cleaning pprof files
# cleaning go caches
# cleaning binaries
# building all examples...
#	building helloworld... done.
$ ./helloworld help
NAME:
   helloworld - An example CDK application

USAGE:
   helloworld [global options] command [command options] [arguments...]

VERSION:
   0.0.1

DESCRIPTION:
   Hello World is an example CDK application

COMMANDS:
   help, h  Shows a list of commands or help for one command

GLOBAL OPTIONS:
   --help, -h, --usage  display command-line usage information (default: false)
   --version            display the version (default: false)
Application Server
This is something not found in GTK at all and is entirely exclusive to terminal
environments. The idea is simple. Be able to write a terminal interface for
local (/dev/tty) and/or remote connections (ssh).
To run the example, everything necessary is already included. Start with running
a make examples…
$ make examples
# cleaning *.log files
# cleaning *.out files
# cleaning pprof files
# cleaning go caches
# cleaning binaries
# building all examples...
#	building appserver... done.
#	building helloworld... done.
There should now be an appserver binary in the current directory.
$ ./appserver help
NAME:
   appserver - run an application server

USAGE:
   appserver [global options] command [command options] [arguments...]

COMMANDS:
   help, h  Shows a list of commands or help for one command

GLOBAL OPTIONS:
   --listen-port value     sets the port for the server to listen on (default: 2200)
   --listen-address value  sets the address for the server to listen on (default: 0.0.0.0)
   --id-rsa value          sets the path to the server id_rsa file (default: ./examples/appserver/id_rsa)
   --htpasswd value        sets the path to the htpasswd file (default: ./examples/appserver/htpasswd)
   --daemon                start a server daemon instead of a server terminal (default: false)
   --help, -h, --usage     display command-line usage information (default: false)
We can see the default settings for the global options to the command. All of
these files are included in the repository and so the defaults should “just
work”.
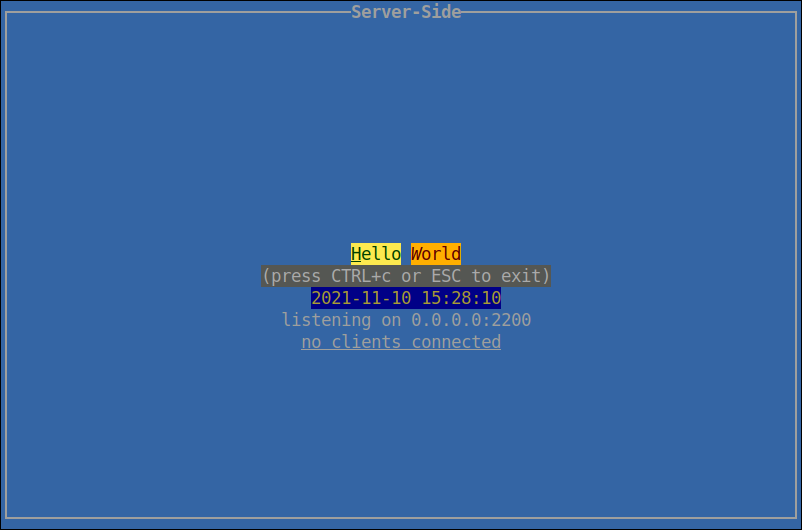
$ ./appserver
A version of the helloworld.go screen should now appear displaying the time,
roughly to the current second. However, in the background the default port of
2200 has been opened and is listening for ssh connections. Note that it also
has a title at the top: “Server Side”.
From a new terminal session, leaving the previous appserver running, login
with ssh with the username foo and the password bar, using localhost and
on port 2200. Note that a second user bar exists as well with the password
foo.
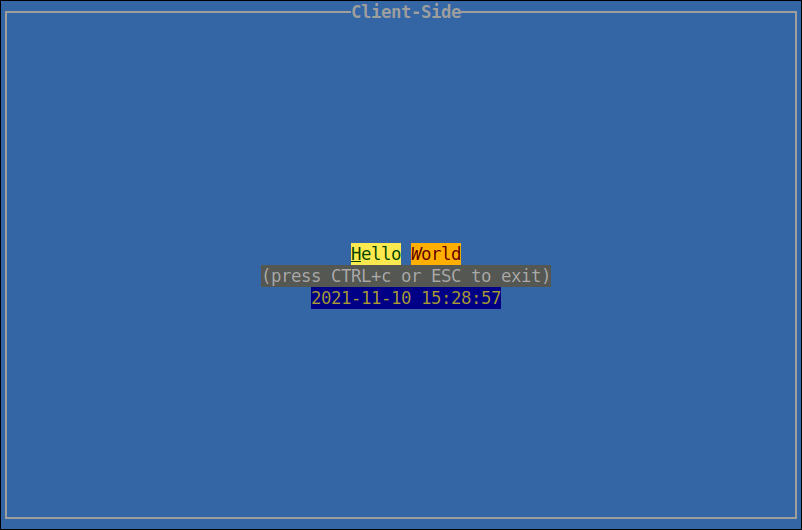
$ ssh -p 2200 foo@localhost
This new session should now be presenting a similar screen as the terminal
server one, with one main difference, the title is “Client Side”. This is not to
say that any code is running on the “Client Side”‘s shell session, just to say
that this is the “connected via ssh” user interface whereas the “Server Side”
one is the server user interface.
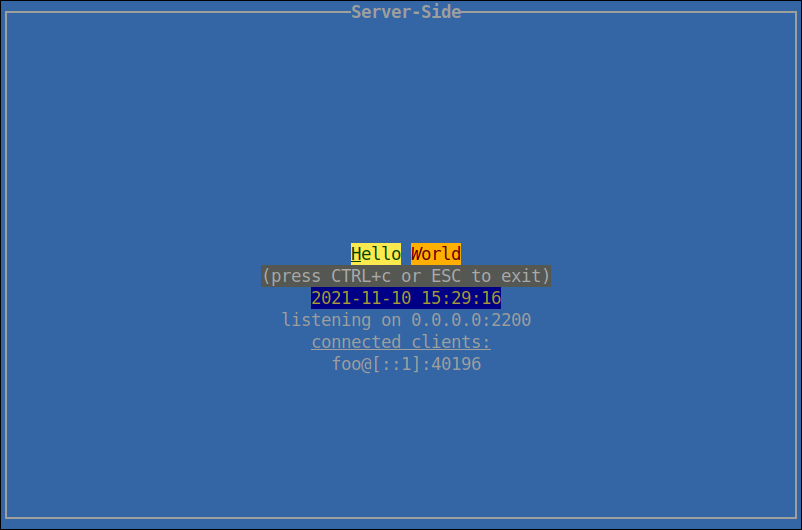
Looking back at the “Server Side” session, it should now report the new client
connection.
Running the tests
There are a handful of sub-packages within the CDK package. The makefile includes
a make test option which covers all of these.
$ make test
# vetting cdk ... done
# testing cdk ...
=== RUN   FirstTests

  ... (per-test output, trimmed for brevity) ...

--- PASS: OtherTests (0.01s)
PASS
ok      github.com/go-curses/cdk     0.037s
Alternatively, GoConvey can be used for that delux developer experience.
# Install GoConvey first
$ go get github.com/smartystreets/goconvey
 ...
# startup the service, this will open the default browser
$ goconvey
Versioning
The current API is unstable and subject to change dramatically.
License
This project is licensed under the Apache 2.0 license – see the LICENSE.md
file for details.
Acknowledgments
Thanks to TCell for providing a great starting point for CDK and thus
making CTK a plausible reality.
This package provides a very rough GDK equivalent for CTK. This is not
intended to be a parity of GDK in any way, rather this package simply fulfills
the terminal drawing and basic event systems required by CTK.
Unless you’re using CTK, you should really be using TCell instead of CDK
directly.
Notice
This project should not be used for any purpose other than intellectual
curiosity. This status is reflected in the tagged versioning of this trunk
branch, v0.5.x, ie: still experimental and unfinished, yet getting near the
word “done”.
Installing
$ go get github.com/go-curses/cdk
Building
A makefile has been included to assist in the development workflow.
$ make help
usage: make [target]

qa targets:
  vet         - run go vet command
  test        - perform all available tests
  cover       - perform all available tests with coverage report

cleanup targets:
  clean       - cleans package and built files
  clean-logs  - cleans *.log from the project

go.mod helpers:
  local       - add go.mod local package replacements
  unlocal     - remove go.mod local package replacements

build targets:
  examples    - builds all examples
  build       - build test for main cdk package
  dev         - build helloworld with profiling

run targets:
  run         - run the dev build (sanely handle crashes)
  profile.cpu - run the dev build and profile CPU
  profile.mem - run the dev build and profile memory
Hello World
An example CDK application demonstrating basic usage and a cdk.Window with customized draw handler.
$ make examples
# cleaning *.log files
# cleaning *.out files
# cleaning pprof files
# cleaning go caches
# cleaning binaries
# building all examples...
#	building helloworld... done.
$ ./helloworld help
NAME:
   helloworld - An example CDK application

USAGE:
   helloworld [global options] command [command options] [arguments...]

VERSION:
   0.0.1

DESCRIPTION:
   Hello World is an example CDK application

COMMANDS:
   help, h  Shows a list of commands or help for one command

GLOBAL OPTIONS:
   --help, -h, --usage  display command-line usage information (default: false)
   --version            display the version (default: false)
Application Server
This is something not found in GTK at all and is entirely exclusive to terminal
environments. The idea is simple. Be able to write a terminal interface for
local (/dev/tty) and/or remote connections (ssh).
To run the example, everything necessary is already included. Start with running
a make examples…
$ make examples
# cleaning *.log files
# cleaning *.out files
# cleaning pprof files
# cleaning go caches
# cleaning binaries
# building all examples...
#	building appserver... done.
#	building helloworld... done.
There should now be an appserver binary in the current directory.
$ ./appserver help
NAME:
   appserver - run an application server

USAGE:
   appserver [global options] command [command options] [arguments...]

COMMANDS:
   help, h  Shows a list of commands or help for one command

GLOBAL OPTIONS:
   --listen-port value     sets the port for the server to listen on (default: 2200)
   --listen-address value  sets the address for the server to listen on (default: 0.0.0.0)
   --id-rsa value          sets the path to the server id_rsa file (default: ./examples/appserver/id_rsa)
   --htpasswd value        sets the path to the htpasswd file (default: ./examples/appserver/htpasswd)
   --daemon                start a server daemon instead of a server terminal (default: false)
   --help, -h, --usage     display command-line usage information (default: false)
We can see the default settings for the global options to the command. All of
these files are included in the repository and so the defaults should “just
work”.
$ ./appserver
A version of the helloworld.go screen should now appear displaying the time,
roughly to the current second. However, in the background the default port of
2200 has been opened and is listening for ssh connections. Note that it also
has a title at the top: “Server Side”.
From a new terminal session, leaving the previous appserver running, login
with ssh with the username foo and the password bar, using localhost and
on port 2200. Note that a second user bar exists as well with the password
foo.
$ ssh -p 2200 foo@localhost
This new session should now be presenting a similar screen as the terminal
server one, with one main difference, the title is “Client Side”. This is not to
say that any code is running on the “Client Side”‘s shell session, just to say
that this is the “connected via ssh” user interface whereas the “Server Side”
one is the server user interface.
Looking back at the “Server Side” session, it should now report the new client
connection.
Running the tests
There are a handful of sub-packages within the CDK package. The makefile includes
a make test option which covers all of these.
$ make test
# vetting cdk ... done
# testing cdk ...
=== RUN   FirstTests

  ... (per-test output, trimmed for brevity) ...

--- PASS: OtherTests (0.01s)
PASS
ok      github.com/go-curses/cdk     0.037s
Alternatively, GoConvey can be used for that delux developer experience.
# Install GoConvey first
$ go get github.com/smartystreets/goconvey
 ...
# startup the service, this will open the default browser
$ goconvey
Versioning
The current API is unstable and subject to change dramatically.
License
This project is licensed under the Apache 2.0 license – see the LICENSE.md
file for details.
Acknowledgments
Thanks to TCell for providing a great starting point for CDK and thus
making CTK a plausible reality.
Once you’ve integrated a Treblle SDK in your codebase, this SDK will send requests and response data to your Treblle Dashboard.
In your Treblle Dashboard you get to see real-time requests to your API, auto-generated API docs, API analytics like how fast the response was for an endpoint, the load size of the response, etc.
Treblle also uses the requests sent to your Dashboard to calculate your API score which is a quality score that’s calculated based on the performance, quality, and security best practices for your API.
This means data masking is super fast and happens on a programming level before the API request is sent to Treblle. You can customize exactly which fields are masked when you’re integrating the SDK.
Visit the Masked fields section of the docs for the complete documentation.
Installing Lumen packages is a lot more complicated than Laravel packages and requires a few manual steps. If you want a completely automated process please use Laravel.
Step 1: Publish config files
The first thing we need to do is publish the Treblle config file and make sure Lumen loads it. To do that we need to copy/paste the package config file like so:
Now we can have Lumen load the config file. We do that by adding a new line in bootstrap/app.php, under the Register Config Files section, like so:
$app->configure('treblle');
We need to register the Treblle middleware in Lumen. To do add a new line of code to bootstrap/app.php, under the Register Middleware section, like so:
You need an API key and Project ID for Treblle to work. You can get those by creating a FREE account on treblle.com and your first project. You’ll get the two keys which you need to add to your .ENV file like so:
Besides the SDKs, we also provide helpers and configuration used for SDK
development. If you’re thinking about contributing to or creating a SDK, have a look at the resources
below:
treblle-utils: A set of helpers and
utility functions useful for the JavaScript SDKs.
php-utils: A set of helpers and
utility functions useful for the PHP SDKs.
Community 💙
First and foremost: Star and watch this repository to stay up-to-date.
You can chat with the team and other members on Discord and follow our tutorials and other video material at YouTube.
How to contribute
Here are some ways of contributing to making Treblle better:
Try out Treblle, and let us know ways to make Treblle better for you. Let us know here on Discord.
Join our Discord and connect with other members to share and learn from.
Send a pull request to any of our open source repositories on Github. Check the contribution guide on the repo you want to contribute to for more details about how to contribute. We’re looking forward to your contribution!
AlignmentViewer is multiple sequence alignment viewer for protein families with flexible visualization, analysis tools and links to protein family databases. It is directly accessible in web browsers without the need for software installation, as it is implemented in JavaScript, and does not require an internet connection to function. It can handle protein families with tens of thousand of sequences and is particularly suitable for evolutionary coupling analysis, preparing the computation of protein 3D structures and detection of functionally constrained interactions.
Installation
AlignmentViewer runs completely locally. There is no installation beyond downloading the files and using a compatible browser.
#Sticky info for Linux:
Since new version needs ffplay and it can’t be found as a static build for Linux, you have to both install ffmpeg package and copy the binaries that I included, ffmpeg and ffprobe manually to /usr/bin/.
#I created script to automate installations: install_vct_apt.sh for Debian, Ubuntu;
#install_vct_yum.sh for Fedora, Centos, etc. Just download it, run and it will download all prerequisites and install VCT in your home dir.
For other distros you need to do it manually. Please scroll to the end of this file to see how, and read INSTALL_README.txt included with download to learn how.
** 64-bit MacOS don’t work with recent mono releases: WinForms are not ported to 64-bit, so it doesn’t work. That’s why I didn’t include it in main release. Older Macs (I have OSX Lion 10.7) seem to work with some GUI rendering issues. Plase try the Windows release with Crossover for Mac on new Macs, although performance is not on par with natively compiled ffmpeg binaries.
v1.9.7.1 Functionality the same as 1.9.5.6. but with updated GUI look: Windows and Linux with mono have similar look; fixed issues with lower resolutions (works from 1200×800 and higher); for res. 1920×1080 and higher works with scaling up to 150%. Default encoding presets are set to balance between output file size and quality.
You can download binaries and source code from Sourceforge:
VCT is frontend for ffmpeg tool which I believe, is the best tool for video/audio files manipulation
It is command line tool, so it may be inconvenient for those users that can only work with some kind of GUI.
I’ve created this tool because I needed some app that can help me convert my entire video library quickly to the H.264 or H.265. Handbrake can do it, but I have to click to every file, select path, etc.
I wanted to achieve 4 goals:
1. to have ability to manually edit any command option of ffmpeg
2. ability to transcode MP4 to MKV and vice versa (thus full length movie transcoding take 2 minutes compared to 2 hours of full conversion)
3. ability to set conversion options and then drag many files onto the VCT to encode them all with same options
4. ability to encode each video (or audio) separately and to add them all to batch list (kinda like Handbrake)
Licensed under Apache v2.0, so you are free to use the source code for any purpose you like, open source or commercial. Just be kind and mention the source!
If you find a bug, or you have an issue, please use discussion board to contact me. If you use GitHub, you can open issue there.
If program is declared an open source, it doesn’t mean that there is no support. On contrary, you can contact developer directly and get the most out of it!
IMPORTANT NOTE about FPS options: if input video file is loaded via “Input File” button, then exact FPS is loaded from file.
In that case, either “Slow Motion” or “Set FPS” can make sense, not both.
But, if you first set options, and then load bunch of files via “Multiple Input Files”, then you must know files FPS and how much to slow down.
In that case, both check boxes can be used, but, BE CAREFUL, or the result may not be satisfactory!
If you load audio file (mp3, aac, etc.), those 2 check boxes are ignored, but they can be set as preparations for the next bunch of files loaded via “Multiple Input Files”.
In any case, if using “Multiple Input Files” option to load bunch of files to be encoded with same options,
you MUST SET ALL OPTIONS FIRST, THEN CLICK TO LOAD FILES.
NOTE FOR LINUX: Please go to the bottom of this readme to see how to install.
Source code for Linux is the same, in theory you could use monodevelop to build and test but I never tried it.
**If you want to use precompiled binaries with Linux, I strongly suggest to use automated installation scripts install_vct_apt.sh and install_vct_yum.sh. They will download end unpack VCT to ~/VCT_mono/ and copy ffplay, ffmpeg and ffprobe to /usr/bin/ and set correct permissions. You can also manually unpack VCT_Linux_mono_binary.zip to some other location (read those scripts and modify them to your needs). I am now mainly using Linux and I can confirm that VCT with Mono gives superior performance, since native Linux FFmpeg binary is used.
VCT has its limitations:
when you define options and drop multiple files “Multiple Input Files” button or to the list, you can’t use subtitles;
you can only encode file with single audio stream, unless you edit the FFmpeg command manually;
if there is subtitle stream inside input file, it will not be copied to output, unless you edit command manually (planned for next major release);
if selecting audio stream when dropping multiple files, you must know how many streams there are and which one is the one you need (if selecting files one by one, you can use Info button to check codec data).
That’s why I left option to manually edit ffmpeg command, for all of you that know, or are willing to learn this tool. You can also manually edit commands in batch list.
ffprobe is included in 1.5.0 so when you click Input File, it is parsed and Info button apears. You can click it so see codec details and thumbnail from video. This could have been acieved with ffmpeg, but ffprobe produces JSON output and I wanted to play with it; and it was fun!
Quick tips for common usage:
I use this tool regularly for 2 tasks
1 to full convert bunch of HD files from smartphone (they are too big, 1 minute – 200 MB). At Convert Tab use preset slower, quality 25 and get 5-10 times smaller files without loosing quality – you can experiment with values – for SD video, use quality 21 – then select multiple files and drag them to the list of button Multiple Input Files
2 to transcode MKV movies to MP4 quickly without changing quality. Set few options first, like stream numbers, etc. and then just select all of them in Windows Explorer and drag them to the button Input File(s) to Transcode on Transcode tab. Then just click Start. It takes 1-3 minutes per movie (depending on the length of the movie, avg. movie is 90+ minutes long);
If you want files to be stored in different folder than input files, then select first Output path where you want to store the new video or audio files, then you will be able to select which files you want to convert/transcode (Input files or Multiple files).
You can use drag&drop instead to click “Input File(s)…” buttons. Just drag file(s) on those buttons from Windows Explorer.
Latest version 1.9.7
Content:
Features
GIT source code location
Change logs
Known issues
Prerequisities
Visual Studio usage
Monodevelop Linux usage
Linux usage
Features:
3 tabs: Transcode, Convert and Record
Transcode tab: select multiple files (mkv, m4v or mp4) and add them to batch list for automatic conversion to other video container (mp4/m4v –> mkv, mkv –> mp4)
Convert tab: 2 options to convert – either by setting options then selecting multiple files (mixture of audio and video files) – or by selecting files one by one, for each file different options possible
selection of options: encode quality, encode speed, audio bitrate, create video file only, create audio file only, stream copy
option to select which audio stream to encode (for multi language movies)
option to insert .SRT subtitle as a stream in the video file (soft subtitles)
advanced options: it is possible to manually edit ffmpeg command in the text box, or directly in the batch tasks list
conversion tasks are stored in a list which can be edited (command edit, select, delete task):
you don’t have to start encoding immediately after adding from “Transcode” or “Convert” tabs
you can add one or more files with different options several times by choosing 1 input file each time or/and selecting multiple files at once,
only after you populate your list completely, by clicking “Start” all tasks will be executed,
conversion can be canceled,
encoding progress displayed in status bar
Pause/Resume encoding tasks
File Info button to display attributes and Play button to open new window and play media file
Record tab: enter address (link) of the Internet or local stream
check stream and display stream attributes in JSON format (codec, streams, title, etc)
play live stream in separate window
each recording or playing process is run in separate window, user can perform other tasks like Transcode or Convert
Help/walkthrough is available in both Binary installation and Source. When installed, Start menu folder is created with links to VCT.exe, help (pdf), license and uninstall option.
Added git repository. It is now preferred method to get source code. To clone use:
git clone https://github.com/zbabac/VCT.git
Please contact me via discussion board if you want to collaborate or send me an email: zlatko.babic@mail.com.
Change log
v1.9.7 Functionality the same as 1.9.5.6. but with updated GUI look: Windows and Linux with mono have similar look; fixed issues with lower resolutions (works from 1200×800 and higher); for res. 1920×1080 and higher works with scaling up to 150%.
v1.9.6.2 The same as 1.9.5.7, but with a fix for Linux exceptions with mono 6.8-6.12 and with .NET framework 4.8 and updated Newtonsoft dll.
v1.9.5.7 Copy specific time range to output in Transcode Tab, works also in Convert tab
**When copying only certain time range in Convert tab, pay attention that it is possible only for some scenarios:
-**e.g. copy streams with resize option
-**copy video stream and encoding audio stream
-**it DOES NOT WORK with some full video encodings
**Fix of copy from specific time to output in Transcode tab
**Bug fix for task list when some task is deleted
v1.9.5.6 Streaming feature in Record tab:
**Comeback of copy from specific time to output in Transcode tab
**Unlimited number of encoding tasks allowed (in the list on the right side)
**New Tab Record is introduced for vieweing and recording audio and/or video streams (from Internet or local network)
**Experimental use introduced FFPlay for playing streams, Play button added to Convert tab as well – separate window is opened for playing asynchronously – you can continue working in the main window
**Since it is still experimental, only basic selection is possible (user can still manually edit ffmpeg command before recording):
**if Audio file is selected to record streaming, then simple copy from stream to the file is given, if you want full conversion on-the-fly, then you must enter options manually for the ffmpeg command
**if Video is selected to record streaming, then options are given to record video in 5 minute segments – if you want to record in a single, large file, then modify the command before clicking Start Recording
**Check Stream button will display stream information in the log panel at the right side – format is JSON, so you can see what codec is used and thus choose appropriate file format
**Source code for Linux mono and Windows forms has finaly converged and it is now the same. Difference is in file naming conventions (slash and backslash, and ffmpeg calls). Runtime check is used to decide if the Linux (or Mac) or Windows is the running platform. For performace reasons, You can of course use Linux (or Mac) Mono, instead of Wine. I use it now predominantly on Linux Debian 9 in the cloud, so that I don’t occupy my own PC
**Linux can’t play stream or file because ffplay is not staticaly built and dependencies are not met. You have to install ffmpeg package: sudo apt-get install ffmpeg and copy included ffmpeg and ffprobe to the /usr/bin/
v1.9.3
**Transcode all streams option “-map 0:v -map 0:a” to try to copy all streams (including multiple audio streams, thanks to user McCoy for suggestion). If it fails, then simply delete the batch task and remove check box for that option on Transcode tab
**If this option is unchecked, then you have option to choose which video and audio stream will be copied to output; by default, first video and audio stream is copied
**Keep file extension – useful with option above unchecked: only first video and first audio is copied and file extension (e.g. MP4) is preserved
**Remove subtitle usage extended with 2 above options: in most of the cases, subtitle is not compatible in MKV and MP4 containers; it is by default set to remove subtitle stream, but you’ve left with option to keep it
v1.9.2.0
Added video resize option (1920, 1280 and 720 width preset), minor GUI changes, last XP UPGRADE to 1.9.2 as separate download
H.265 is by default encoded as 8-bit so it can be run on modest HW (Raspberry Pi)
Linux updated to 1.9.2
Windows XP as separate download (this is the last XP version)
Changelog since v1.9.0
Start/Pause/Resume button allows to pause encoding tasks in case you want to do something else on your PC and then resume encoding
removed CPU option since it is obsolete with new ffmpeg version
Changelog since v1.8.1.0
added option to remove embedded subtitle from source, since there were problems noticed with some files (e.g. subtitle stream positioned before audio stream)
added “Remove Output Path” button; before, it was neccessary to close the app to change output path
fixed all errors that caused file info not to display some audio or video info
compiled as 64-bit application and included ffmpeg and ffprobe v4.0.2 64-bit binaries from zeranoe
removed “strict experimental” for audio encoding, since it is obsolete with new ffmpeg
Changelog since v1.7.0
feature to set output FPS rate and to create slow motion video from high FPS source,
corrected minor bug “Info” button not visible
Changelog since v1.6.1
support for new AAC codec,
strict experimental option added for compatibility with XP
Changelog since v1.6.0.1
support for H.265 (HEVC) – check box added at Convert tab next to the CPU check box
H.265 already supported at Transcode tab
if single file opened, automatically detected H.265 codec
new Quality settings added for H.265 – 28 (h265) approx. corresponds to 23 (h264) or 20 for SD
Known issues:
Avast on XP could block setup execution with strange messages like: “path could not be found…”. Please scan VCT_setup.exe with AV program, then disable file shield and run setup again. It could be the case with other AV software.
On Windows 7 and 8, there is DEP active and once you confirm that you want to run the setup, it will install without problems.
Antivirus software can cause problems after installation. Windows can give message: “windows cannot access the specified device path or file you may not have appropriate permissions”. Avast antivirus is blocking execution. If you are worried about security, please scan this app first or compile it yourself from the source.
You basically need to add scanning exclusion to the installation path, default is: “C:\Program Files (x86)\VCT” or “C:\Program Files\VCT”.
Update: new Avast version uses Deep scan at first run, so everything is ok.
Update 2: Windows 8 and 10 will try to prevent installation. After you scan setup file, click Advanced, then click install anyway.
Prerequisities:
If you download setup, all neccessary dependencies are installed (ffpmeg, pdf help), except .NET 4.8 Framework. It is included with Windows 10, bu tperhaps not with Windows 7 and 8. Please download it from Microsoft if VCT doesn’t start.
Visual Studio usage:
Source code files created by VS 2022 Community Edition, so just unpack and opeb the solution with VS. However you can create project in VS 2010 (tested) or VS 2012, just create a new folder and copy all files except *.sln and *.suo to that folder. Then, simply open VCT.csproj with your version of Visual Studio.
Whenever I add new version I provide the latest ffmpeg.exe and ffprobe static build compiled by zeranoe, but if you want a more recent one, just download and replace the existing one. License, download paths are mentioned in About box.
LINUX MONO USAGE
Application is built using Winforms so it has MS Windows looks, not the native Linux looks you would expect in Gnome or KDE. I changed GUI elements to be flat in appeareance so that win and linux looks don’t differ much.
UPDATE: I added small scripts to automate installations.
For Debian, Ubuntu, etc. with APT package manager download install_vct_apt.sh, and run it(provide sudo credentials): ./install_vct_apt.sh or just double click it – execute in terminal! It will update packages, download VCT_mono_binary and create desktop file vct.desktop which you can double click to run the program (edit it manually to reflect your program path if you intalled in location other that $HOME).
For Fedora, Centos, etc. with YUM package manager download install_vct_yum.sh, and run it(provide sudo credentials): ./install_vct_yum.sh or just double click it – execute in terminal! It will update packages, download VCT_mono_binary and create desktop file vct.desktop which you can double click to run the program (edit it manually to reflect your program path if you intalled in location other that $HOME).
Program will be installed in $HOME/VCT_mono/.
For other distros that use other package managers, please read INSTALL_README.txt and install manually, like in the example below:
Prerequisities:
You must have mono installed to run .NET application.
You must have ffmpeg packages installed.
Exact installation procedure is within those 2 scripts mentioned above so you can use them as template to modify installation process.
After you install ffmpeg and mono, unpack VCT_Linux_mono_binary.zip to directory of your choice. I will give example as if you put it in your home dir. Use sudo bash if permissions are inadequate.
The same procedure applies to MacOS.
Open terminal and go to dir. where VCT_Linux_mono_binary.zip is saved, usually Downloads:
cd $HOME/Downloads
unzip VCT_Linux_mono_binary.zip -d $HOME
cd $HOME/VCT_mono
chmod 777 *
Now, copy supplied binaries to the /usr/bin/ so they will overwrite installed old versions of ffmpeg:
sudo cp ff* /usr/bin/
you can now run:
mono $HOME/VCT_mono/VCT.exe
or create launcher at desktop or menu.
it should display MS Windows-like window
Compiling from source code on Linux
Since beta v1.9.5, the source is the same for Linux, Mac and Windows. You can use Mono Develop to compile from source. The difference is only in ffmpeg, ffprobe and ffplay binaries. These are included with VCT binary download, but if you build from source, you must provide those 3 binaries and copy them to the same directory where the VCT.exe and Newtonsoft.Json.dll are located (or inlude path to ff* binaries: export PATH=$PATH:<ffmpeg_path>)
The directory tree has the following convention of algorithms/{language}/{category}/{problem}, where {language} represents the language code of the problem (Eg.CPlusPlus for C++, CSharp for C# etc.), {category} is the topic or category of the problem being contributed (Eg.strings, sorting, linked-lists etc.), and {problem} is a conforming name to the problem (Eg.linear-search.cpp, palindrome, queue-linked-list.cpp etc.)
A unit problem must conform to the following specifications:
The name should be in lowercase. (Eg.palindrome/, binary-search.cpp etc.).
Each word must be separated by a dash or a hyphen (-).
If you have a problem that belongs to a new topic or category than one which are present:
Create a new folder and an index for it inside (a readme, README.md file).
To each new index file, write the readme with your problem in it (Markdown Documentation).
The folder name can also only contain lowercase characters and dashes or hyphens (-) (Eg. stringssorting etc.)
Simple (File) Contributions
The file should conform to the problem specification, and the extension (Eg.linear-search.java, kruskal-algorithm.cpp, count-inversions.js etc.)
Project/Folder-based Contributions
The project and folder-based contributions have a bit more stricter contribution contribution specifications.
The folder should conform to the problem specification, along with the following specifications
Folder Structure
problem-name\
| - .gitignore
| - README.md
| - Makefile # or the specific specification/requirements/configuration file| - src\
| - main.ext
README.md Specification / Template
# <TitleoftheProblem>
< description of the problem >
## Prerequisites- prerequisite library or package
-[prerequisite library](https://www.example.com/link-to-official-library)## Instructions- instructions to run the project
- < Simple and reproducible commands to execute the project >
```bash
make # or 'cargo run', or 'dotnet run' or 'mvn exec:java' etc.```## Test Cases & Output < if exists>
< If you can provide test cases, describe it here, else remove this section >
.gitignore File
# add all output files and build files to be excluded from git trackingmain# executable file also must have the project nametarget/ # the build file, for example for rust
The source code files, should either be in src/ folder (Eg.src/main.cpp or src/main.js) or the root folder (Eg.palindrome.go or App.java) where ext is the file extension for the specific programming language.
Again, the source codes must conform to a valid file structure convention that the programming language enforces.
2. Naming Convention
The programming should keep the naming convention rule of each programming language.
An npm package to read Google Sheets data and convert it to JSON without publishing it to the web. Simply change Share access to “Anyone with the link can View”.
Give a ⭐ if you found this package interesting!
Why is it different
It is not required to “Publish to Web” in order for this package to work. Simply change Share access and it is ready to go.
For help getting started with Flutter development, view the
online documentation, which offers tutorials,
samples, guidance on mobile development, and a full API reference.
Here is what is known about the programming language Quylthulg.
Quylthulg:
is a programming language;
is named Quylthulg;
was designed by Chris Pressey;
does not, quite apart from prevailing trends in programming
practice, shun the use of goto;
is, however, somewhat particular about wheregoto may be used
(goto may only occur inside a data structure);
is purely functional (in the sense that it does not allow
“side-effectful” updates to values);
forbids recursion;
provides but a single looping construct: foreach, which applies an
expression successively to each value in a data structure;
is Turing-complete; and
boasts an argument-less macro expansion facility (in which recursion
is also forbidden.)
Syntax
The syntax for identifiers draws from the best parts of the esteemed
languages BASIC and Perl. Like Perl, all identifiers must be preceded by
a $ symbol, and like BASIC, all identifiers must be followed by a $
symbol. Well, OK, that’s for strings anyway, but we don’t care about
their types really, so we use $ for everything. (Also, studies show
that this syntax can help serious TeX addicts from “bugging out”.)
A nice practical upshot of this is that identifier names may contain any
characters whatsoever (excepting $), including whitespace.
Because of this, the syntax for string literals can be, and is, derived
from the syntax for identifiers. A string literal is given by a ~
followed by an identifier; the textual content of the name of the
identifier is used as the content of the string literal. A string
literal consisting of a single $ symbol is given by ~~.
Many find the syntax for labels to be quite sumilar to that for
identifiers. (Some even find it to be quite similar.) Labels are
preceded and followed by : symbols, and may contain any symbol except
for :.
Syntax for binary operations follows somewhat in the footsteps of the
identifier syntax. It is a combination of prefix, infix, and postfix
syntax, where the two terms must be preceeded, followed, and seperated
by the same symbol. We call this notation panfix. It is perhaps worth
noting that, like postfix, panfix does not require the deployment of
arcane contrivances such as parentheses to override a default operator
precedence. At the same time, panfix allows terms to be specified in the
same order and manner as infix, an unquestionably natural and intuitive
notation to those who have become accustomed to it.
So, we give some examples:
*+1+2+*3*
&~$The shoes are $&&~~&~$9.99 a pair.$&&
The first example might be stated as (1+2)*3 in conventional, icky
parenthesis-ful notation, and evaluates to 9. The second evaluates to
the string “The shoes are $9.99 a pair.”
There are no unary operators in Quylthulg. (Note that ~ isn’t really a
unary operator, actually not an operator at all, because it must be
followed by an identifier, not an expression. Well, maybe it’s a special
kind of operator then, an identifier-operator perhaps. But you see what
I’m getting at, don’t you? Hopefully not.)
There is a special 6-ary operator, foreach. It has its own syntax
which will be covered below.
Data Types
Strings and Integers
Yes. Also a special type called abort, of which there is a single
value abort, which you’ll learn about later.
Lists
The sole data structure of note in Quylthulg is the list. Lists are
essentially identical to those found in other functional languages such
as Scheme: they are either the special value null, which suggests an
empty list, or they consist of a cons cell, which is a pair of two
other values. By convention, the first of this pair is the value of this
list node, and the second is a sublist (a null or a cons) which
represents the rest of this list.
The value of a list node may be any value: a scalar such as an integer
or a string, another (embedded sub)list, or the special value abort. cons cells are constructed by the , panfix operator. Some examples
follow:
,1,,2,,3,null,,,
,1,,2,3,,
The first example constructs a proper list. So-called “improper” lists,
which purely by convention do not end with null, can also be
constructed: that’s the second example.
When all of the terms involved are literal constants embedded in the
program text, there is a shorthand syntax for these list expressions,
stolen from the Prolog/Erlang school:
[1, 2, 3]
[1, 2 | 3]
Note, however, that [] is not shorthand for null. Note also that
when this syntax is used, all values must be literal constants: there
will be no tolerance for variables. There will, however, be tolerance
for gotos and labels; see below for more on that.
Cyclic Lists
Labels and the goto construct enable the definition of cyclic data
structures like so:
Note that this can only be done in literal constant data structure
expressions, not in , (consing) operations or expression involving a
variable. This is to avoid the dynamic construction of labelled terms,
which just a tad mind-bending and which I’ve decided to save for a
sequel to Quylthulg, whatever and whenever that might be. Note also that
labels have their own syntax during declaration, but (oh so helpfully)
insist on being referred to in gotos by the $ syntax used for
identifiers.
List Operators
The values contained in a cons cell can be extracted by the felicitous
use of the binary operators < (‘first’) and > (‘rest’). For both of
these operators, the left-hand side is the cons cell to operate on,
and the right-hand side is an expression which the operator will
evaluate to in the case that it cannot successfully extract the value
from the cons cell (e.g., the left-hand side is not in fact a cons
cell but rather something else like a null or a number or a string or abort.
There is also an operator ; which appends one list (the right-hand
side) onto the end of another list (the left-hand side.) This is
probably not strictly necessary, since as we’ll see later we can probably
build something equivalent using foreaches and macros, but what the
hell, we can afford it. Party down.
These list operators honour cyclic lists, so that >[:X: 4 | goto :X:]>abort>, to take just one instance, evaluates to 4.
Control Flow
Quylthulg’s sole looping construct, foreach, is a recursing abortable
“fold” operation. It is passed a data structure to traverse, an
expression (called the body) that it will apply to each value it
encounters in the traversed data structure, and an initial value called
the accumulator. Inside the body, two identifiers are bound to two
values: the value in the data structure that the body is currently being
applied to, and the value of the current value. The names of the
idenfiers so bound are specified in the syntax of the foreach
operator. The value that the body evaluates to is used as the
accumulator for the next time the body is evaluated, on the next value
in the data structure. The value that foreach evaluates to is the
value of the final accumulator (emphasis mine.) The full form of this
operator is as follows:
foreach $var$ = data-expr with $acc$ = initial-expr be loop-expr else be otherwise-expr
foreach traverses the data structure in this manner: from beginning to
end. It is:
recursing, meaning if the current element of the list is itself a
(sub)list, foreach will begin traversing that (sub)list (with the
same body and current accumulator, natch) instead of passing the
(sub)list to the body; and
abortable, meaning that the loop-expr may evaluate to a special
value abort, which causes traversal of the current (sub)list to
cease immediately, returning to the traversal of the containing
list, if any.
If the data-expr evaluates to some value besides a cons cell (for
example, null or an integer or a string), then the loop-expr is
ignored and the otherwise-expr is evaluated instead.
As an example,
-foreach $x$ = [2, 3, 4] with $a$ = 1 be *$a$*$x$* else be null-1-
will evaluate to 23. On the other hand,
foreach $x$ = null with $a$ = 1 be $a$ else be 23
will also evaluate to 23.
Macro System
Quylthulg boasts an argument-less macro expansion system. (Yes, there is
no argument about it: it boasts it. It is quite arrogant, you know.)
Where-ever text of the form {foo} appears in the source code, the
contents of the macro named foo are inserted at that point, replacing {foo}. This process is called the expansion of foo. But it gets
worse: whereever text of the form {bar} appears in the contents of
that macro called foo, those too will be replaced by the contents of
the macro called bar. And so on. Three things to note:
If there is no macro called foo, {foo} will not be expanded.
If {foo} appears in the contents of foo, it will not be
expanded.
Nor will it be expanded if it appears in the contents of foo as
the result of expanding some other macro in the contents of foo.
(I stand corrected. That was more like 2.5 things to note.)
Macros can be defined and redefined with the special macro-like form {*[foo][bar]}. The first text between square brackets is the name of
the macro being defined; the text between the second square brackets is
the contents. Both texts can contain any symbols except unmatched ]‘s.
i.e. you can put square brackets in these texts as long as they nest
properly.
Now you see why we don’t need arguments to these macros: you can simply
use macros as arguments. For example,
{*[SQR][*{X}*{X}*]}{*[X][5]}{SQR}
uses an “argument macro” called X which it defines as 5 before
calling the SQR macro that uses it.
Note that macros are expanded before any scanning or parsing of the
program text begins. Thus they can be used to define identifiers,
labels, etc.
Comments
The macro system also provides a way to insert comments into a Quylthulg
program. It should be noted that there are at least three schools of
thought on this subject.
The first school (Chilton County High School in Clanton, Alabama) says
that most comments that programmers write are next to useless anyway
(which is absolutely true) so there’s no point in writing them at all.
The second school (Gonzaga College S.J. in Dublin, Ireland — not to be
confused with Gonzaga University in Spokane, Washington) considers
comments to be valuable as comments, but not as source code. They
advocate their use in Quylthulg by the definition of macros that are
unlikely to be expanded for obscure syntactical reasons. For example, {*[}][This is my comment!]}. Note that that macro can be expanded in
Quylthulg using {}}; it’s just that the Gonzaga school hopes that you
won’t do that, and hopes you get a syntax error if you try.
The third school (a school of fish) believes that comments are valuable,
not just as comments, but also as integral (or at least distracting)
parts of the computation, and champions their use in Quylthulg as string
literals involved in expressions that are ultimately discarded. For
example, <~$Addition is fun!$<+1+2+<.
Integration with the Rest of the Language
To dispel the vicious rumours that the macro system used in Quylthulg
and the Quylthulg language are really independent and separate entities
which just happen to be sandwiched together there, we are quick to
point out that they are bound by two very important means:
At the beginning of the program, at a global scope, the identifier $Number of Macros Defined$ is bound to an integer constant
containing the number of unique macros that were defined during
macro expansion before the program was parsed.
The panfix operator % applies macros to a Quylthulg string at
runtime. The expression on the left-hand side should evaluate to a
string which contains macro definitions. The expression on the
right-hand side is the string to expand using these macro
definitions.
Turing-Completeness
Now, I claim that Quylthulg is Turing-complete — that is, that it can
compute anything that a Turing machine (or any other Turing-complete
system) can. I would provide a proof, but since the point of a proof is
to dispel doubt, and since you have not expressed any doubt so far (at
least none that I have been able to observe from my vantage point), and
since (statistically speaking anyway) you believe that fluoride in
drinking water promotes dental health, that the sun is a giant nuclear
furnace, that Wall Street is substantially different from Las Vegas,
that a low-fat diet is an effective way to lose weight, that black holes
exist, and that point of the War on Drugs is to stop people from harming
themselves — well, in light of all that, a proof hardly seems
called-for. Instead, I shall perform a series of short vignettes, each
intended to invoke the spirit of a different forest animal or
supermarket checkout animal. Then I shall spray you with a dose of a new
household aerosol which I have invented and which I am marketing under
the name “Doubt-B-Gone”.
We can use foreach as an if-then-else construct by using lists to
represent booleans.
Using null to represent false, and cons anything to represent
true, we use the else part of foreach to accomplish a boolean
if-then-else. We can employ ; to get boolean OR and nested foreaches to get boolean AND. (Detailed examples of these can be
found in the unit tests of the Quylthulg reference interpreter,
which is called “Qlzqqlzuup, Lord of Flesh”.)
We can construct an infinite loop by running foreach on a cyclic
data structure.
For example,
foreach $x$ = :L:[1, 2, 3, goto $L$] with $a$ = 0 be $x$ else be null
never finishes evaluating, and in the body, $x$ takes on the
values 1, 2, 3, 1, 2, 3, … ad infinitum.
We can treat the accumulator of a foreach like an unbounded tape,
just like on a Turing machine.
We can pass in a cons cell where the first value is a list
representing everything to the left of the head, and the second
value is a list representing everything to the right of the head.
Moving the head left or right can be accomplished by taking the
first (<) off the appropriate list and cons (,) it onto the
other list. There are also other ways to do it, of course. The point
is that there is no bound specified on the length of a list in
Quylthulg.
We can, in fact, make foreach act like a while construct.
We just combine the looping forever with an if-then-else which
evaluates to abort when the condition comes true.
We can give foreach a cyclic tree-like data structure which
describes the finite control of a Turing machine.
Although we don’t have to — we could just use nested foreaches to
make a lot of tests against constant values.
We can even make foreach work like let if we need to.
Just bind the accumulator to $Name$, refer to $Name$ in the
body, and ignore the contents of the one-element list. Or use it to
bind two variables in one foreach.
PHHSHHHHHHHHHHHHHHTt.
Discussion
Now I’m hardly the first person to suggest using cyclic lists as an
equivalent alternative to a general looping construct such as while.
It has long been a stylish LISP programming
technique. However,
to comply with the Nietzschean-Calvinist mandate of our society (that
is, to sustain the progress that will thrust us toward the
“Perfect Meat at the End of Time” of which Hegel spoke,) we must demonstrate that we have innovated:
Quylthulg provides only this method of looping; without it, it
would not be Turing-complete, and
Unlike the extant stylish programming techniques, which require
side-effecting operations such as rplacd to pull off, Quylthulg is
a pure functional programming language without updatable storage.
Huzzah.
It is somewhat sad to consider just how long Quylthulg took to design
and how much of that labour took place aboard airplanes. It is even
sadder to consider some of the delusions I was occupied with while
designing it. Some of the biggest were the idea that foreach somehow
had to be recursable for this to work — it doesn’t, but I left it in.
For similar reasons I left in ;, the append operator. And I’ve already
mentioned the headaches with allowing labels and gotos in expressions
rather than only in literals.
Long live the new flesh, eh?
Chris Pressey
Seattle, Washington
Dec 6, 2008


 https://github.com/tomdbar/all-optical-neural-networks